According to NKBA’s 2026 Bath Trends Report, 72% of industry respondents say homeowners are making more room for wellness-centered spaces, universal design, and efficient storage in the primary bathroom. The large master bath layout has moved from a size upgrade to a design category with its own spatial logic and occupant expectations.
A large bathroom floor plan gives designers the floor space to separate wet zones from dry zones in ways a standard bath simply can’t support. That separation, between a soaking tub position and a walk-in shower design, between the vanity area and the water closet bathroom, is where luxury bathroom ideas become genuinely livable.
This blog covers 10 large bathroom layout examples with recommended dimensions, spatial logic, interior design specs, and pro tips.

Common Large Layout Features
Let’s look at the four spatial features of a large bathroom layout that smaller bathrooms cannot accommodate, all of which depend on having a clear understanding of a space before a single fixture position is committed:
- Separate Wet Zone: A large master bathroom layout separates the freestanding bathtub from the walk-in shower as two distinct plumbing fixtures rather than a combined wet zone. Keeping both elements separate requires a minimum 160 sq ft floor area to maintain comfortable clearance around each and deliver the spacious bathroom feel the primary suite brief demands.
- Double Vanities: A double-sink vanity in a large bathroom layout requires 50 to 80 sq ft for two people to use simultaneously without crossing paths. Standard double vanities measure 60 to 72 inches wide, giving each occupant a full 36-inch working zone and enough counter space for daily prep without fixture conflicts.
- Water Closet: For privacy, a large master bathroom layout encloses the toilet in a ventilated compartment separate from the main floor area. Per NKBA guidelines, this requires a minimum 36-by-66-inch alcove and a pocket door to preserve corridor flow, with the center line of the toilet positioned 15 to 18 inches from each side wall.
- Specialty Zones: High-end large bathroom layout plans add seated makeup vanities, integrated linen storage solutions, or built-in laundry units near the dressing area. Each specialty zone requires a minimum of 24-inch front clearance to keep the main circulation route unobstructed and the room’s overall function intact.

10 Luxury Large Bathroom Layout Examples
Each layout below covers a distinct spatial problem a designer will encounter on a primary bathroom brief, arranged from the most landmark-led configurations through to the most comprehensive fixture programs.
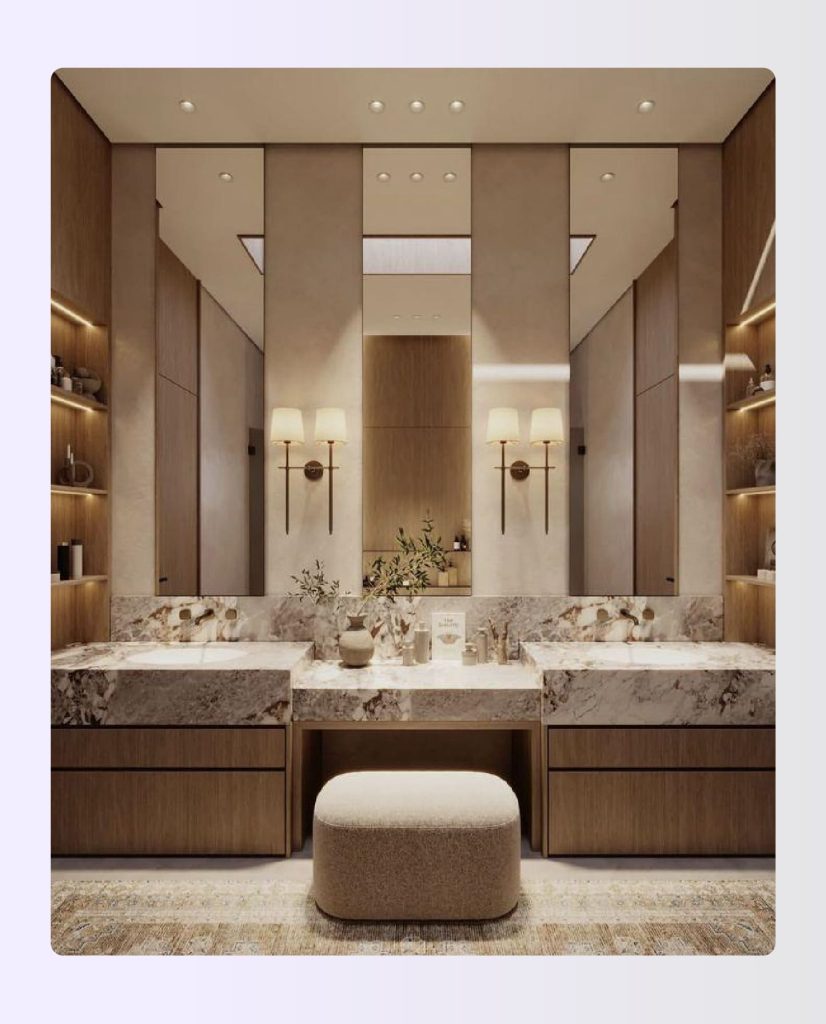
1. The Island Tub Large Master Bath Layout
Source: Pinterest, Paty Jiménez
A freestanding bathtub positioned at the room’s geometric center makes the tub a sculptural focal point visible from every entry angle. This large master bath layout works best in a square bathroom space where equal wall lengths can balance the central mass on all four sides, creating a cohesive look between the symmetrical vanity walls and the central wet piece.
Recommended Size: 180 to 220 sq ft
Spatial Logic: The central tub creates a 360-degree circulation path that separates the wet zone from the vanity walls without a partition.
Interior Design Specs
- Circulation around the tub: Maintain a minimum 36-inch walkway on every side before placing any secondary fixture or storage unit.
- Vanity symmetry: Twin vanities, 60 to 72 inches each, should flank the two longest walls to balance the visual weight of the central island tub. Architectural elements, such as recessed niches above each vanity station, reinforce the symmetrical reading without adding floor area to the plan.
- Plumbing specification: Floor-mounted filler fittings require a reinforced subfloor to support the concentrated weight of a filled cast-iron or stone tub, which can exceed 800 lbs. Flag the structural requirement before any subfloor work begins, since retrofitting after the pour carries a hefty fee in any bathroom remodel context.
| Pro Tip:
Convert the 2D floor plan to 3D to verify the island tub’s central balance from every angle before confirming fixture placement. Any asymmetry in the circulation path becomes immediately visible. |
2. The Walk-Through Layout
3. The Dual-Wing Master Suite Layout
Source: Pinterest, Adriana Kassel
The dual-wing layout places two independent vanity stations on opposing walls with the wet zone occupying the center rear of the room, creating genuine simultaneous use without any fixture crossing. It is the one I recommend when the brief explicitly mentions “no waiting.”
Recommended Size: 200 to 250 sq ft
Spatial Logic: Opposing vanity walls eliminate the physical crossing that a single shared vanity creates. The central wet zone stays acoustically and visually separate from both stations.
Interior Design Specs
- Wing Width: Each vanity wing requires a minimum 48-inch clear width to allow drawer use without the swing intruding into the central zone. Less than 48 inches per wing defeats the purpose of a dual-wing large bathroom layout plan.
- Wet Zone Partition: A frosted glass partition at 48 to 54 inches high separates the wet zone from both vanity wings without blocking natural light from either station. A full-height wall creates a three-room configuration that breaks the layout’s spatial coherence.
| Foyr Tip:
Use Foyr Neo’s partition library to test half-height versus full-height wet zone dividers at an accurate scale before specifying any structural element in the dual-wing plan. |
4. The Garden-Integrated Glass House Layout

This large bathroom layout treats an adjacent garden or courtyard as the room’s primary design element, using floor-to-ceiling glazing to dissolve the boundary between the interior wet zone and the outdoor landscape. It works on corner lots or single-story master suites where the site plan already resolves privacy from the street.
Recommended Size: 180 to 240 sq ft
Spatial Logic: The glazed wall becomes the dominant architectural feature, orienting every fixture toward it so both the soaking tub and the vanity hold a view-led position.
Interior Design Specs
- Glazing Specification: Specify laminated low-iron glass with a UV-protective coating to prevent finish material fading from direct sun exposure. Standard float glass will yellow the interior palette within two to three years of sustained direct sun exposure, undermining the visual appeal of every natural wood and stone finish in the space.
- Privacy Strategy: A planted buffer of dense screening shrubs at a minimum height of 1.8 meters, or louvered external screens, must be resolved in the brief before glazing is confirmed. A glass-wall bathroom without a privacy solution is not presentable to the client, and resolving it post-construction carries electrical costs and structural complications that the initial brief should have addressed.
- Shower Position: Position the walk-in shower against the internal wall rather than the glazed wall to keep the wet zone away from the exterior junction. This avoids the waterproofing complexity where a curbless shower floor meets a glass-to-slab junction
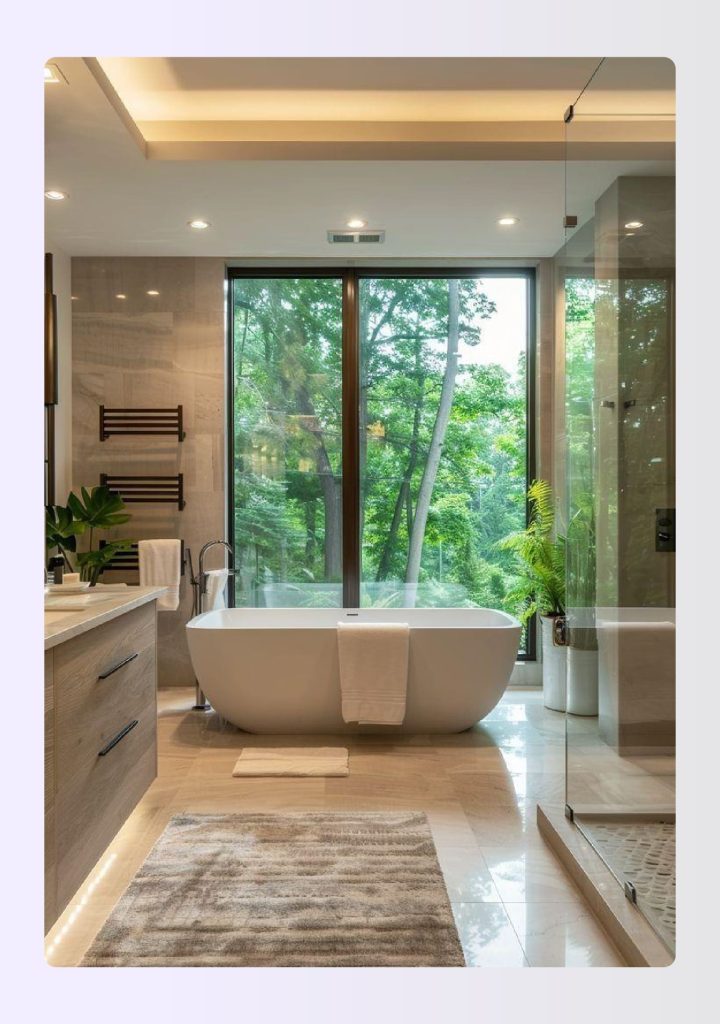
5. The Open-Concept Bedroom Integration

Source: Pinterest, Goodworksfurniture
The open-concept bedroom integration removes the door between the sleeping area and the bathroom, treating both spaces as a single suite with the freestanding tub as the shared visual anchor. It requires a clear understanding of the client’s daily routine, since acoustic and moisture considerations are significant in this configuration.
Recommended Size: 150 to 200 sq ft (bathroom zone within a larger primary suite)
Spatial Logic: The absence of a door means the tub position drives the sight line from the bed. This makes fixture placement a primary suite design decision rather than a bathroom design decision.
Interior Design Specs
- Moisture Management: A ducted exhaust system rated at a minimum 110 CFM is required in any open-concept bathroom integration to prevent condensation migrating into bedroom textiles and wall finishes. As a general rule of thumb, specify this at the mechanical brief stage, not after the suite layout is fixed.
- Acoustic Flooring: Specify a heavy tile format of at least 12 by 24 inches on a sound-dampening membrane across the full bath zone to reduce acoustic transfer from shower and tub use into the sleeping area. Hardwood floors without acoustic underlayment amplify every early-morning sound directly into the bedroom, which is the last thing any client wants from a primary suite investment.
| Foyr Tip:
In Foyr Neo, use the lighting simulation tool to model the tub zone’s ambient light levels before confirming the open-concept bathroom configuration with the client. |
Check out this video to learn how to try large bathroom layout ideas quickly using Foyr Neo:
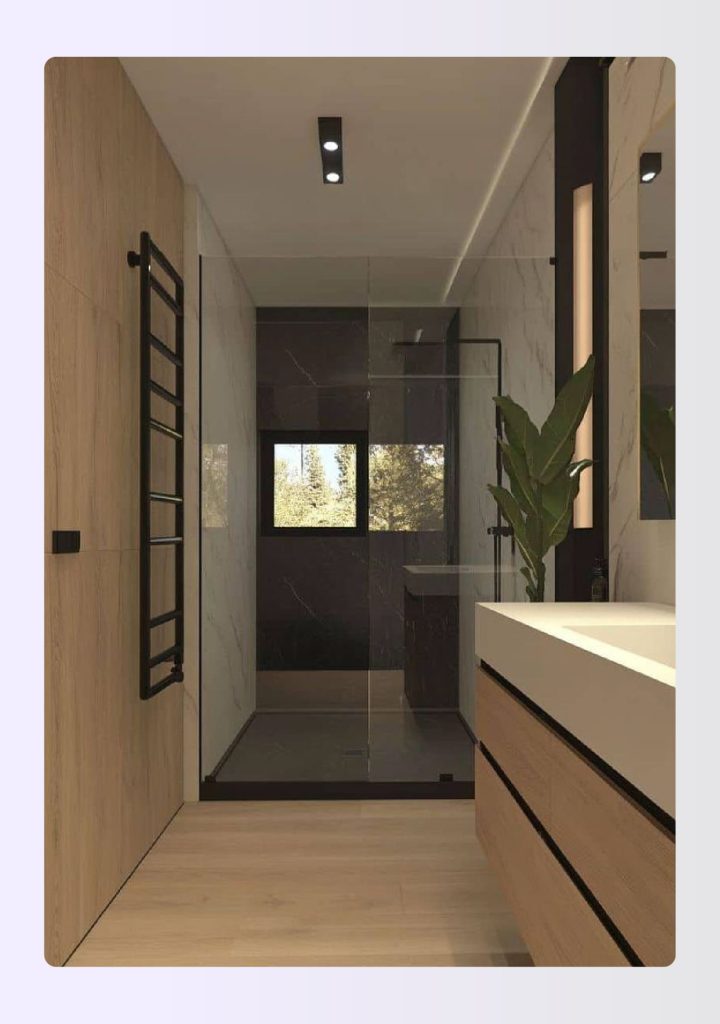
6. The Wet Room Wonderland

Source: Pinterest, Home Bunch
The full wet room removes all shower enclosures and treats the entire bathroom space as a single waterproofed drainage plane, creating a spa bathroom design where the shower zone is defined by the floor slope rather than any glass partition. It’s the modern design layout that creates the strongest bathroom feel of luxury in a primary suite brief when executed to the correct technical standard.
Recommended Size: 160 to 200 sq ft
Spatial Logic: The absence of enclosures makes the floor slope the primary spatial organizer. The linear drain position at the far wall becomes the structural anchor for every fixture and tile layout decision.
Interior Design Specs
- Floor Specification: The entire wet room floor requires a minimum 1/4-inch-per-foot slope from all directions toward the linear drain, with a waterproofing membrane extending 6 inches up all walls. A point drain requires a four-directional slope, which makes large-format tile installation significantly more complex.
- Ventilation: A wet-rated exhaust fan at a minimum 1 CFM per square foot of floor area is the code minimum, with a second unit required if the ceiling height exceeds 10 feet. Undersized ventilation in a full wet room creates persistent moisture damage through wall-surface condensation.
“Every fixture clearance in a large bathroom layout is a structural decision. Set the perimeter requirements first and the walls, storage and finishes will resolve themselves around a plan that already works.”
— Team Foyr
7. The T-Shape Large Bathroom Floor Plan

A large T-shaped bathroom floor plan places the vanity along the vertical stem and the wet zone across the horizontal crossbar. This creates a clear physical separation between grooming and bathing without building a full partition wall.
Recommended Size: 160 to 210 sq ft
Spatial Logic: The perpendicular crossbar physically separates the wet zone from the vanity stem. The moisture from the shower position never migrates toward the vanity wall during daily use.
Interior Design Specs
- Stem Width: The vanity stem needs a minimum 60-inch clear width to fit a 60 to 72-inch double vanity while maintaining 30 inches of front clearance for daily use. Narrower than 60 inches, the corridor undermines the spatial separation that the T-shape is designed to create.
- Junction Placement: The T-junction is the correct location for a full-height mirror wall, as it receives sight lines from both the stem and the crossbar simultaneously. Placing the mirror on any other wall in this large bathroom floor plan misses the spatial opportunity the plan’s geometry provides.
| Foyr Tip:
In Foyr Neo, apply the T-shape floor plan template and adjust the crossbar width in real time to test wet zone dimensions before fixing structural wall positions. |
8. The Gallery Layout

The gallery layout concentrates all fixtures along one long service wall and leaves the opposing wall entirely clear. It creates a visual corridor that reads as intentional luxury rather than a compromise of a narrow floor plan. it is, the layout I recommend for primary bathrooms that are long and narrow by structure rather than by choice.
Recommended Size: 140 to 180 sq ft
Spatial Logic: Concentrating all wet zone plumbing on one service wall is the lowest-cost layout to build. All supply and drain runs share a single rough-in, and the clear opposing wall becomes the room’s primary design surface.
Interior Design Specs
- Service Wall Sequence: Run fixtures in dry-to-wet order from the entry: double vanity first, toilet alcove at mid-run, walk-in shower at the far wall. This sequence moves the occupant from the most-used to the least-used fixture, reducing morning traffic crossing within the large bathroom layout.
- Opposing Wall Treatment: Specify a full-height stone or large-format tile feature on the clear opposing wall rather than cabinetry or mirrors. In a gallery layout, the opposing surface is the room’s visual centerpiece regardless of what is placed on it.

9. The Floating Vanity and Loft-Style Layout

Source: Pinterest, Decor Crowd
The floating vanity layout mounts all vanity units wall-hung at 18 to 20 inches above the finished floor. This creates a continuous visible floor plane that makes the master bathroom design appear significantly larger than its measured square footage.
Recommended Size: 140 to 180 sq ft
Spatial Logic: The continuous floor plane beneath the wall-hung units eliminates the visual breaks that floor-mounted cabinetry creates, and the perceived ceiling height increases when nothing interrupts the eye’s path from floor to ceiling.
Interior Design Specs
- Mounting Height: Install floating vanities at 32 to 36 inches to the finished surface, two to four inches above standard vanity height, to account for the visual lift of a wall-hung unit. A 32-inch vanity at that height reads as low when the ceiling exceeds 10 feet.
- Wall Reinforcement: Specify timber blocking installed between studs at vanity height before drywall is applied, as a wall-hung vanity carrying a stone countertop and two undermount sinks can weigh 300 to 450 lbs in a large bathroom floor plan.
| Pro Tip:
Confirm the 18-inch floor-to-bottom clearance on wall-hung vanities at the 3D stage before specifying blocking heights to the structural team. A clearance error at this stage is a framing correction on site |
10. The Ultimate Five-Fixture Executive Layout

The five-fixture executive layout includes a toilet, bidet, double-sink vanity, walk-in shower and freestanding soaking tub, each a separate, fully functional fixture in a single large master bathroom. The term “five-piece” is sometimes used in real estate but carries inconsistent definitions, so I’d brief every client on exactly which five fixtures are included before the plan proceeds.
Recommended Size: 220 to 280 sq ft
Spatial Logic: The five fixtures need to be zoned into a grooming zone (vanity plus bidet and toilet), a wet zone (shower and tub) to prevent the layout from reading as a fixture showroom.
Interior Design Specs
- Toilet and bidet pairing: Position the toilet and bidet side by side with a minimum 15-inch clearance from each fixture’s centreline to the adjacent wall or fixture. This pairing requires a minimum 60-inch-wide alcove to meet the clearance standard for both fixtures simultaneously.
- Circulation: Allow a minimum 42-inch clear circulation path between the grooming and wet zones to accommodate two occupants moving simultaneously without fixture conflicts. Less than 42 inches in a five-fixture layout means the floor plan is working against the brief rather than for it.
Check out this Foyr video to learn how you can create realistic 12K renders in minutes with our bathroom planner tool to impress the clients:
Technical Design Considerations for a Large Bathroom Layout
Before any large bathroom layout reaches the client, four technical decisions determine whether the plan delivers on its spatial promise or requires costly corrections during construction.
- Plumbing Stacks and Fixture Clustering: Position all toilets, showers and tubs as close to the existing plumbing stack as the bathroom layout plan allows, since every additional foot of drain run adds material cost. Flag approximate pipe-run distances on the schematic before the contractor quotes the project.
- The 60/40 Active-to-Negative Space Rule: Keep 60% of the floor plan in active use for fixtures and vanity areas, and reserve 40% as clear negative circulation space. A large bathroom layout that ignores this ratio reads as a fixture warehouse rather than a primary suite.
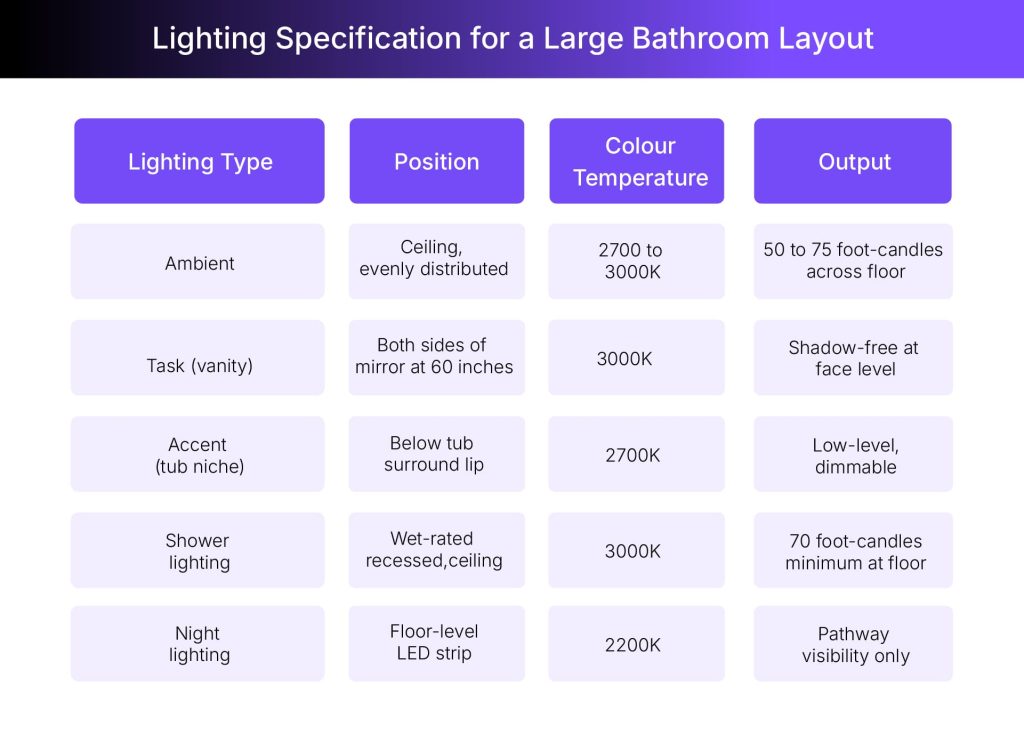
- Lighting Layers: A large master bathroom layout requires three independent circuits: ambient at 2700 to 3000K, task lighting at 50 to 75 foot-candles at each vanity mirror position, and accent LED strips in niches and at the tub surround for evening use.
- Ventilation and Moisture Control: A wet-zone exhaust system rated at a minimum 1 CFM per square foot of wet zone floor area is the code minimum for any large bathroom layout with a separate shower or full wet room. Undersized ventilation creates persistent condensation damage across wall finishes, mirror backs, and cabinetry that no reseal program can fully correct.
Why Use Foyr Neo for Your Large Master Bath Layout?
A large master bath layout involves more variables than any other residential brief, from fixture clearances to material finish selection. Foyr Neo consolidates every one of those decisions into a single resolved workflow at an accurate scale.
Here are the key Foyr Neo capabilities that help you create a good bathroom layout in a few minutes:
- Ruler Tool for Clearance and Code Verification: Foyr Neo’s Ruler Tool maps precise clearances between every fixture in the large bathroom layout and verifies that each measurement meets code requirements.
- 12K Photorealistic Rendering in Minutes: Foyr Neo renders the full large master bath layout in 12K photorealistic quality, with accurate material finishes and real-world lighting ambiance.
- 60,000-Plus Render-Ready 3D Models: Foyr Neo’s library of over 60,000 render-ready 3D models includes every fixture, fitting and material a large bathroom floor plan requires, all at accurate dimensions.
- Cloud-Based Access and Real-Time Collaboration: Foyr Neo’s cloud-based platform allows the large master bath layout model to be accessed and shared with clients for direct review on any device, with no high-end hardware required.
Our interior design software reduces revision rounds on large bathroom layout projects by resolving clearance and finish conflicts at the model stage rather than on-site.
Sign-up for a 14-day free trial of Foyr Neo and start designing your large bathroom layout ideas.
FAQs
What is the golden rule for bathroom layouts?
The golden rule is to resolve fixture clearances before specifying finishes. Place the 36-inch perimeter around every freestanding fixture and the 30-inch front clearance at every vanity position first, then build walls and storage around those clearances. A large bathroom floor plan that fails clearance requirements cannot be corrected by any finish material or lighting specification after construction is complete.
What is a good size for a large bathroom?
A large bathroom layout starts at 100 sq ft for a primary bathroom serving one occupant and typically runs from 140 to 220 sq ft for a full master suite with a double vanity, separate shower, soaking tub and water closet. A five-fixture executive layout requires 220 to 280 sq ft to maintain all clearances without the large master bath layout reading as overcrowded.
What are common bathroom layout mistakes?
The most frequent mistake is placing the soaking tub at the window wall without verifying that the plumbing rough-in can reach that position without a full subfloor re-run. The second is specifying a double vanity at 72 inches in a room where the opposing wall leaves only 18 inches of front clearance, which fails the 30-inch NKBA minimum. Ignoring the 40% negative space rule is the third mistake that turns a large bathroom layout into a fixture warehouse.
What adds the most value to a bathroom?
A water closet enclosure for the toilet delivers the highest resale return per square foot in a primary bathroom because it resolves the privacy issue every shared bathroom brief eventually raises. A curbless walk-in shower with a linear drain adds more market value than a soaking tub in most areas, as NKBA’s 2026 Bath Trends Report shows over half of homeowners now prioritize shower size above the bathtub.
What is the 80/20 rule in interior design?
The 80/20 rule states that 80% of a room’s surface area should carry the dominant material or palette, with 20% reserved for the accent or contrast element. In a large bathroom layout, this means specifying the primary tile or stone across 80% of wall and floor surfaces and reserving 20% for a feature material at the tub surround, vanity splashback or shower niche. More than 20% accent surface in a master bathroom design creates visual competition between materials that reduces the luxury the layout is designed to deliver.