A narrow small bathroom layout forces every fixture decision into a footprint that won’t forgive poor sequencing. Most corridor bathrooms feel cramped, not because of their width but because the planning decisions arrived in the wrong order.
You are working with a hallway footprint where a standard 21-inch vanity consumes most of the walkway before a toilet is placed alongside it. This depth conflict is where most narrow bathroom remodels lose budget and floor space simultaneously.
By reading the sight line first and choosing the right narrow bathroom floorplan, you can turn a skinny space into something that feels intentional. Light colors and correct fixture placement always outperform finish materials in a limited space.
Whether you are dealing with a powder room or a narrow full bathroom layout, this blog covers seven floor plan configurations, the design principles that prevent a cramped feel, and the planning issues that sink most narrow remodels early.

Understanding the Dimensions of a Narrow Bathroom
Narrow bathroom dimensions follow recognizable patterns, and knowing which footprint category you are working with determines which layout options are available.
- Standard Narrow Footprints: Most narrow bathrooms fall into one of four recognizable footprint ranges, each with a different design ceiling to work from.
- 3×9 feet (27 sq ft): Powder room territory, limited to a toilet and a pedestal sink.
- 4×8 feet (32 sq ft): Minimum viable full bath with a corner shower stall.
- 4×10 feet (40 sq ft): Narrow full bathroom layout with enough length for a tub-shower combination.
- 5×8 feet (40 sq ft): Standard narrow full bath, the most common footprint in real homes.
- Code Minimums: These clearance requirements are non-negotiable regardless of how tight the floor plan feels from any angle.
- Toilet centerline: Minimum 15 inches from any side wall, 18 inches preferred.
- Front clearance: 21 inches minimum by code, 24 inches for daily-use comfort.
- Shower interior: 30×30 inches minimum, 36×36 recommended for actual usability.
- The 36-Inch Walkway Rule: I use the 36-inch walkway as the first test on any narrow bathroom plan, before committing to any fixture placement.
- 30 inches is the minimum for a comfortable single-user daily function.
- 24 inches can be legally possible in some jurisdictions, but the room will feel cramped.
- Reducing vanity depth from 21 to 18 inches restores 3 inches of walkway width without touching the plumbing rough-in.
| Pro Tip: In rooms narrower than 48 inches, I always specify a vanity depth of 18 inches to maintain the 36-inch walkway minimum without relocating the existing plumbing rough-in. |

Source: Pinterest, Kiera Champlin
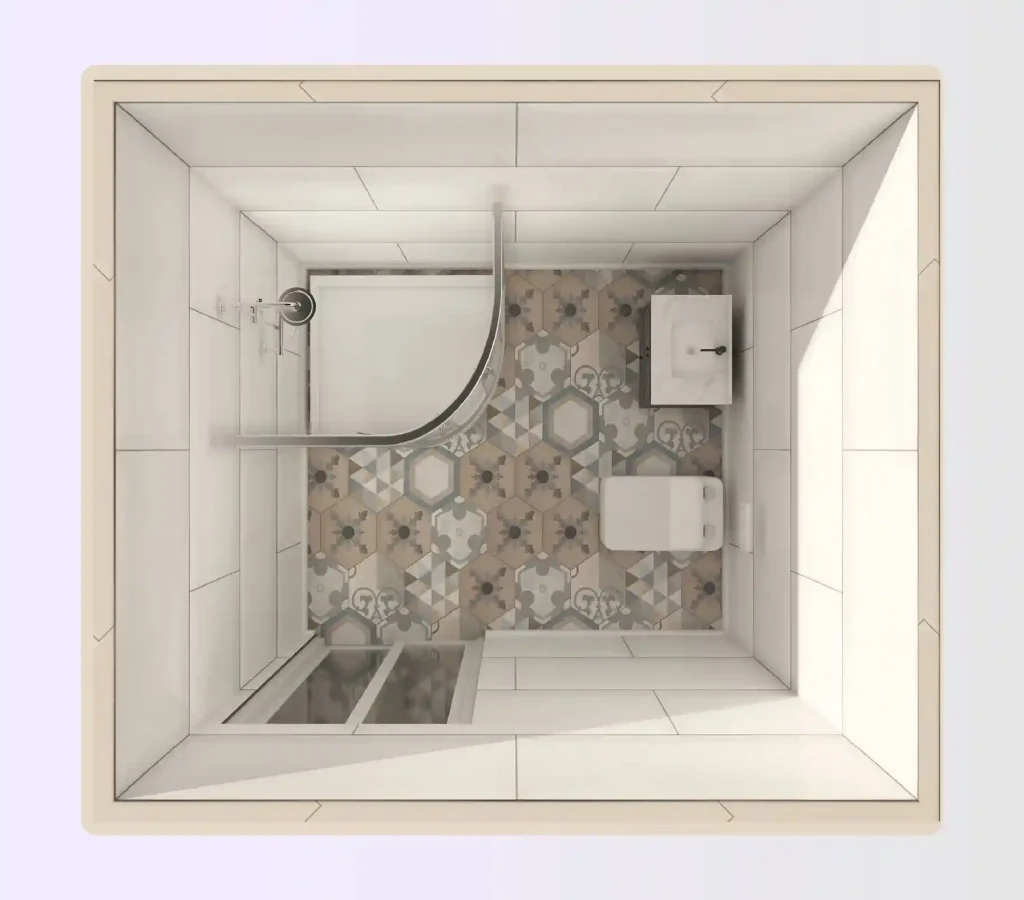
The linear galley runs every fixture along one service wall, leaving the full opposite wall open as circulation space. All plumbing shares a single rough-in, keeping renovation costs predictable.
Best for: Extra-skinny bathrooms under 4 feet wide, where concentrating all plumbing on a single service wall is the only viable option.
Design Layout: Set the vanity at the entry end and the shower at the far wall, with the toilet mid-run between them. This dry-to-wet sequence keeps the wet zone contained and the dry zone closest to the door.
Key Measurements:
- Vanity depth maximum: 18 inches in rooms under 48 inches wide
- Toilet centerline: Minimum 30 inches from the vanity edge
- Shower stall: 36×36 inch minimum at the far end
| Foyr Tip: Use Foyr Neo’s ruler tool to verify service wall clearance against the opposite wall before placing any fixture. A 2-inch variance changes whether the walkway passes the 30-inch minimum. |
Layout 2: The End-to-End Full Bath

The end-to-end layout places the vanity at the entry, the shower at the far wall, and the toilet mid-run. It creates a dry-to-wet sequence that reads logically from the door. I use it in any room, with enough length to separate the two zones.
Best for: Narrow rooms of 40 square feet or more, with enough length to create physical wet and dry zone separation.
Design Layout: Position the vanity within 24 inches of the door wall to keep the full door swing clear. Glass shower doors at the far end allow light to travel the full length of the room.
Key Measurements:
- Entry clearance: 24 inches minimum between door arc and vanity face
- Toilet front clearance: 24 inches between the toilet face and the shower wall
| Pro Tip: In a narrow full bathroom with no far-end window, always specify a frameless glass enclosure so light travels the full length of the room without interruption. |
Layout 3: The Split Two-Wall Configuration

Source: Pinterest, D. J. Stavropoulos Homes
The split two-wall places the vanity on one long wall, with the toilet opposite, and the shower at the far end. Distributing mass across both walls changes how the room reads at entry.
Best for: Narrow bathrooms between 5 and 6 feet wide, where distributing fixture depth across two long walls creates a genuine central walkway.
Design Layout: Mount the vanity at 18-inch depth on one wall and position the toilet with a 15-inch centerline on the opposite. Confirm 30 inches of clear central corridor between both fixture faces before committing.
Key Measurements:
- Central corridor: 30 inches clear between vanity face and toilet edge
- Toilet centerline: 15 inches from each long wall when fixtures oppose
- Corner shower: 36×36 inch minimum at the far-end wall junction
| “Distributing fixtures across two walls stops a narrow bathroom from reading as a corridor. That layout decision outperforms any tile choice or color palette in changing how the space feels at entry.”
Foyr Team |
Layout 4: The Modern Wet Room

A wet room converts the entire floor to a waterproofed drainage plane, removing the enclosure boundary that divides a narrow bathroom. The space reads as a single continuous surface rather than as separate zones.
Best for: Narrow bathrooms under 5 feet wide where fitting any shower enclosure door would push the walkway below the minimum safe clearance.
Design Layout: Waterproof the entire floor at a minimum 1/4-inch-per-foot slope toward a linear drain on one long wall. A wall-hung toilet and floating vanity on the opposing wall keep the floor plane visually continuous.
Key Measurements:
- Floor slope: Minimum 1/4 inch per foot toward the linear drain
- Toilet front clearance: 21 inches minimum from wall-hung unit to any wall
Layout 5: The Tucked Away Alcove Plan

The alcove plan tucks the tub into a far-end pocket, removing the wet zone from the main circulation path. The remaining floor reads as clear dry space the occupant never has to navigate around.
Best for: Narrow bathrooms between 4 and 5 feet wide that need a tub, particularly when removing the tub entirely would meet client resistance.
Design Layout: Recess the tub into the far-end alcove at a minimum 30-inch width and a standard 60-inch length. A sliding door at the bathroom entry covers 9 to 10 square feet of turning radius, compared to a standard inward-swinging door.
Key Measurements:
- Alcove depth: 30 inches minimum plus 6-inch tile surround on three sides
- Toilet front clearance: 21 inches minimum from alcove entry edge forward
| Pro Tip: A sliding door at the entry of an alcove plan recovers 9 to 10 square feet without touching any plumbing rough-in positions. |
Layout 6: The Window-Centric Linear Layout

The window-centric layout treats the far-end window as the primary design anchor for the entire narrow bathroom floor plan. All fixtures run along one service wall, so the sight line travels from the entry directly to the light source.
Best for: Narrow bathrooms with a window at the far short wall, where natural light is used as a focal point to create an illusion of more space without any construction work.
Design Layout: Keep all fixtures on the service wall opposite the window, and mount a large mirror across the full width of the vanity wall to bounce light back toward the entry. Position the vanity near the entry so the user faces the window during morning prep.
Key Measurements:
- Mirror width: Minimum 80 percent of the full vanity wall span
- Vanity position: entry-end placement confirmed so the user faces the window
Layout 7: The Divided Zone Layout

The divided zone layout uses a low partition or glass panel to create visual separation between the shower area and the toilet, adding perceived depth to a narrow space. It solves a privacy problem that usually requires a second room in a larger bathroom.
Best for: Shared narrow bathrooms where toilet and shower privacy is a daily functional requirement, without the cost of building a full dividing wall.
Design Layout: Position a partition at 42 to 48 inches above the finished floor, measured from the toilet centerline, to create privacy without blocking overhead light. Specify the partition in the same tile as the floor so the zone division results in a continuous surface.
Key Measurements:
- Partition height: 42 to 48 inches from finished floor for privacy without blocking light
- Toilet zone: 30 inches clear minimum from partition face to the opposite wall
| Foyr Tip: In Foyr Neo, set the partition position first using the guideline tool before placing any other fixture, so zone division logic drives every subsequent clearance decision. |
If you want to see how fixture sequencing translates into a working narrow small bathroom layout inside Foyr Neo, check out this tutorial:
Design Principles to Prevent a Cramped Feel
These four principles apply to every narrow bathroom floor plan regardless of layout, budget, or the specific fixtures the project requires.
- Floating the Floor: Wall-hung vanities and toilets are non-negotiable for any narrow bathroom floor plan where walkway clearance is already limited. A wall-hung toilet immediately recovers 6 to 8 inches of front clearance.
| A mistake that everyone makes in tiny bathrooms is not wall-mounting fixtures like the sink, which could make the room look bigger.Lisa Holt Design (https://www.youtube.com/shorts/Oi6Zm9_R-n0) |
- The Power of Large Format Tiles: Large-format tiles reduce grout line count across floor and walls, removing the grid that makes a small bathroom appear fragmented and narrower. Use 12×24-inch as the minimum for any narrow layout.
- Mirror Magic: A wall-to-wall large mirror above the vanity doubles the perceived horizontal space and reflects natural light where the window can’t reach. Always specify frameless mirrors in rooms under 48 inches wide.
- Lighting Layers: A single overhead light creates corner shadows that make any narrow space appear shorter than its actual dimensions. Keep perimeter LED strips at 2700K from the rough-in stage.
If you are still trying to figure out how to master narrow small bathroom layout ideas, check out this video from Foyr Neo:
Common Pitfalls in Narrow Bathroom Planning
Three planning errors appear across narrow bathroom projects at every budget level, and each one is preventable before submission.
- The Door Swing Trap: A standard inward-swinging door in a narrow bathroom consumes the only clear floor space in the layout. A pocket door recovers 9 to 12 square feet without any plumbing changes.
- Over-Sized Vanities: A standard 21-inch vanity in a 36-inch corridor leaves only 15 inches of walkway, which fails most code clearance requirements. Ensure 18-inch maximum vanity depth in any narrow bathroom floor plan.
- High-Contrast Borders: A dark floor border creates a visual pinch, making any narrow space read as narrower than its measured width. Match grout to tile within one shade across the entire bathroom floor.
| For a small bathroom, you have to be careful about what type of bathtub you choose and may even have to consider not having a bathtub at all
Reynard Lowell, https://www.youtube.com/watch?v=GbJYVGgTWts |
How to Create Your Narrow Bathroom Layout on Foyr Neo?
Here the steps you must follow to create your narrow small bathroom layouts in Foyr Neo:
- Draw or Upload Your Plan: Input your room dimensions from the site survey using Foyr Neo’s precision measurement tools, including door swing and window positions.
- Drag-and-Drop Fixtures: Select fixtures from the 60,000+ model library and position them using the ruler tool to verify every clearance number.
- Switch to 3D for a Quick Check: Use one-click 2D to 3D conversion to walk the room from entry to the far wall after placing every fixture. This catches sight line problems and clearance conflicts that a plan view never reveals.
- Instant Texture Swaps: The AI Magik Bar swaps tile formats and finishes with a typed prompt, no model rebuilds required. Switching from a 4×4 mosaic to a 12×24 tile immediately shows the grout-line difference.
- Render in 12K: Foyr Neo’s rendering produces a photorealistic 12K render of your narrow bathroom layout in minutes.

Design Narrow Small Bathroom Layouts with Foyr Neo
Foyr Neo lets you test any narrow small bathroom layout at an accurate scale before a product is ordered or a wall is opened. Our 10,000+ templates include narrow configurations ready to adapt for each brief.
Here is how our interior design software streamlines your design process:
- Test every narrow bathroom clearance number against local code before placing fixtures.
- Create immersive 3D walkthroughs to let clients experience the narrow bathroom layout before any physical work begins.
- Share photorealistic 12K renders with clients before any purchasing decision is made.
- Collaborate with clients in real time on the same design file, so feedback is resolved in a single session.
Try Foyr Neo free for 14 days and design your narrow small bathroom layout before any work on your next project begins.
| “A narrow bathroom only feels like a constraint when you measure it in feet. Measure it in sightlines instead, and most of the design problems resolve before the budget conversation starts.”
— Foyr Team |
FAQs
Is 4 feet too narrow for a bathroom?
A 4-foot-wide bathroom works as a full bath when an 18-inch vanity and a wall-hung toilet maintain a 30-inch walkway and clear the 21-inch front clearance required by code. Below 36 inches of width, meeting that clearance alongside a functional vanity becomes impossible, and the powder room is the only honest planning option.
What is the narrowest width for a bathroom?
A powder room functions at a minimum of 36 inches wide using a wall-hung toilet and a corner sink that clears the 21-inch front code requirement. For a full bathroom including a shower, 48 inches is the minimum functional width, since anything narrower forces essential fixtures into clearance conflict regardless of vanity depth or layout configuration.
What are common small bathroom design mistakes?
The most frequent error is specifying a standard 21-inch vanity in a room where the walkway is already below 36 inches, which causes the toilet clearance to fail before any other fixture is placed. The second is an inward-swinging door, since it consumes the only clear floor space the narrow bathroom layout possesses and creates a daily collision zone between the door arc and the nearest fixture.
How to maximize space in a narrow bathroom?
Specifying a wall-hung toilet alongside a floating vanity is the highest-impact combination in any narrow bathroom, since both remove floor-level mass and recover 6 to 8 inches of front clearance without changing the plumbing rough-in. Adding 12×24-inch large-format tiles and a large frameless mirror facing the primary natural light source enhances the spatial effect.
Is 6×6 too small for a bathroom?
A 6×6-foot bathroom at 36 square feet is not too small for a full bath with a shower, provided the layout preserves 21 inches of front-toilet clearance and a 30-inch walkway through the main circulation path. The design challenge at this square footage is the bathroom vanity specification, since a standard 21-inch unit leaves only 51 inches of horizontal space.