Your sleepless nights and endless scrolling through social media for creative ceiling designs end here. Tray ceilings are trending, and with the right approach, you can create the most coveted designs for your clients. Understanding the crux of ceiling design and how best to decorate them is key to achieving stunning results.
They are radically different from other types of ceilings and require meticulous planning to get both the design and construction right. Using a room design planner, you can visualize different tray ceiling styles, experiment with lighting placements, and ensure seamless integration with the overall room aesthetic before execution.
That’s why we’ve put together this blog for you—to guide you through the essential construction angles to consider and inspiring decor ideas to incorporate when designing ready-to-build tray ceilings.
What is a Tray Ceiling?
A tray ceiling, also known as a recessed or inverted ceiling, features a central section that is raised about six inches to a foot higher than the perimeter. This design creates a visual effect resembling an upside-down tray, adding architectural depth and dimension to a room. It breaks the monotony of a flat ceiling, providing a custom, high-end look suitable for various spaces like living rooms, dining rooms, and master bedrooms. This answers the common question of what is tray ceiling for homeowners and designers alike.
Pros and Cons of a Tray Ceiling
Let’s have a look at the pros and cons of a tray ceiling:
Pros
- Adds Architectural Interest: Creates a sophisticated, custom look that enhances a room’s aesthetic appeal.
- Creates an Illusion of Height: The raised center makes the room feel taller and more spacious.
- Defines Spaces: Effectively delineates specific zones, such as a dining area, within an open-concept floor plan.
- Versatile Lighting Options: Ideal for installing ambient cove lighting, recessed lights, or showcasing a statement chandelier.
Cons
- Collects Dust: The ledges and recessed areas can accumulate dust, requiring regular cleaning.
- Complex Installation: Requires precise framing and can be challenging for a DIY project.
- Reduces Headroom: The lowered perimeter can make rooms with already low ceilings feel smaller.
Potential Higher Costs: The cost of materials and labor can be higher than a standard flat ceiling.
Tray Ceilings vs Coffered Ceilings vs Vaulted Ceilings
| Tray Ceilings | Coffered Ceilings | Vaulted Ceilings |
| They have a raised center section | They have sunken panels or indentations with surrounding beams | They have a higher ceiling central point and slope upwards towards the walls |
| They are wide-spaced and border a room’s perimeter in a step-like design | Beams and moldings are arranged in a grid-like pattern | Arched, dorm shape creates a sloped ceiling that follows the roof line |
| Suitable for all home decor styles | This type of ceiling design is majorly suitable for specific interior design styles like transitional, contemporary, farmhouse, and eclectic | Suitable for all interior design styles |
| Make a room feel larger and more open | Makes a room feel grand and opulent | Makes a room feel open and airy |
Benefits of Installing a Tray Ceiling
Here are the key benefits of installing a tray ceiling:
- Increases Perceived Height and Space: A tray ceiling design creates an illusion of height, making rooms feel more spacious without actually changing the structural dimensions. This perception of added space is particularly valuable in rooms that might otherwise feel confined or cramped.
- Adds Architectural Interest and Style: The stepped design of a tray ceiling provides architectural detail that transforms an ordinary room into a distinctive space with character. This feature can become a stunning focal point that elevates the overall design aesthetic of your home.
- Enhances Lighting Possibilities: Tray ceiling design ideas often incorporate various lighting options that wouldn’t be possible with a flat ceiling. From recessed lighting around the perimeter to dramatic chandeliers in the center, the lighting opportunities are endless and can dramatically change the mood of a room.
- Defines and Separates Spaces: In open-concept layouts, tray ceilings can help define different functional areas without the need for walls or dividers. This subtle delineation of space maintains an open feel while providing visual cues about the purpose of each area.
- Conceals Wires and Ducts; The recessed design provides practical benefits by creating space to hide unsightly wires, ductwork, and other mechanical elements that might otherwise be visible or require a drop ceiling.
How to Build Tray Ceilings?
When it comes to building a tray ceiling for a new home or as part of a remodel, or home improvement for a house, you are faced with two options. First, the built-down method involves framing the tray ceiling down below the rood truss system. For this, you need to accommodate an elaborate fire stop. It’s more expensive and needs to be done by a professional handyman only. Second, we have another method wherein we design and build tray ceilings on the existing ceilings.
Either way, you need a lot of forethought and planning when designing tray ceilings, since you have to include even the tiny details accurately in the blueprint, and final plan.
Read also – How to Choose Safe and Showy Stairway Runners?
Step 1: Get Fire Blocking in Place Early On
If you want to go the DIY route, make sure you have all the materials ready beforehand. You’ll need a lot of screws, half-inch OSBs, and 2x4s.
The first step is to build fire blocking. This is essential, regardless of whether you’re working with an all-wooden house, or not. When the room is finished and the drywalls installed, and God forbid a power outlet catches fire, it can spread pretty quickly up the wall. The OSB we add stops the fire from jumping into the cavity because there’s a top plate that sandwiches it all together and prevents the fire from spreading to the attic and running throughout the house.
It’s a simple detail that can’t be ignored when you’re planning to design a tray ceiling. Take 12 pieces of ½ inch OSB and stick them up against the wall across the room.
You may wonder how the fire can be contained in an all-wooden house through fire blocking. The trick is to delay the spread as much as possible to give the residents time to get out.
Step 2: Build Short Walls
Construct a small wall on the floor using a 2×4 bottom plate, 16-inch on-center studs, and a 2×4 top plate. Integrate a top sheet with a 20-inch gap for fire blocking. Place 2x4s strategically for securing subsequent OSB sheets. Ensure the integrity of the back sheet OSB, top sheet OSB, and the 2×4 at the edge to facilitate the installation of a 12-inch OSB sheet.
Step 3: Pin Half Walls Into Place
Screw every couple of studs and put them at the base, where you can rest their weight on the screws while you work on tucking the walls in place. Ensure you carry out the designing and building according to the building code at all times. For 10-foot ceilings, you can build 1-foot tray ceilings and experiment with them. You can construct tray ceilings anywhere you want, and ensure adequate headroom. You can do it for existing homes much more easily than you would for new constructions. With existing homes, you can build them on top of pre-existing drywalls of the home and make them doubly safe.
Read also – 27 Hidden Door Ideas That Make You Want to Build a Secret Room Today
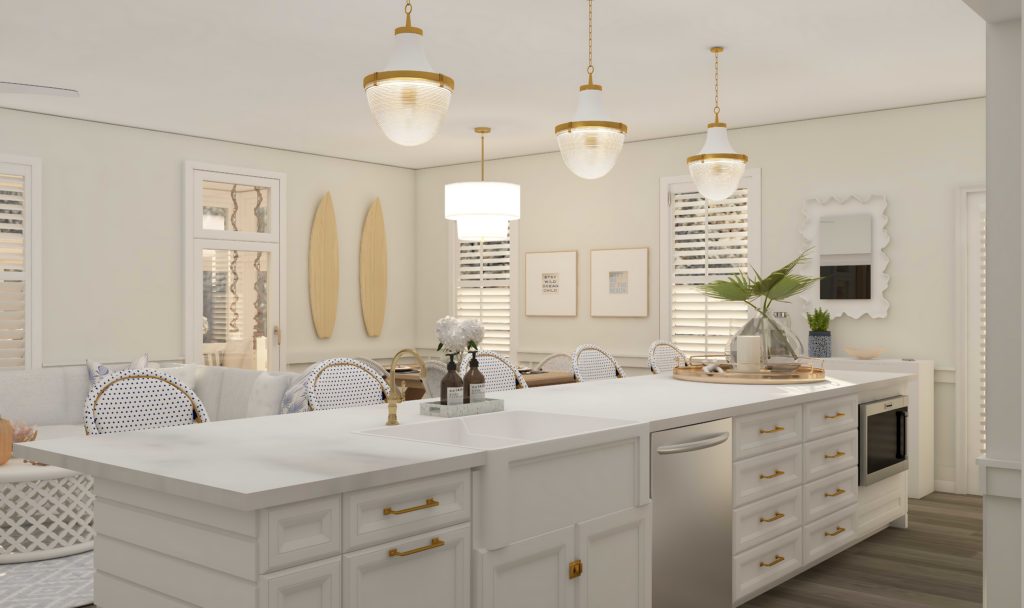
Step 4: Decorate the Ceiling
Now that you have tray ceilings in place, all safe and secure, go ahead and decorate them with stylish ceiling ideas using different colors, shapes, textures, patterns, and forms. Tray ceilings go well with all types of interior design styles.
Creative Tray Ceiling Decor Ideas
Here are some interesting tray ceiling decor ideas:
Frame with Elegant Crown Molding

Install crown molding that complements your overall design style in the space. You can choose vivid patterns if you’re working with traditional homes, or sleek and geometric patterns if you’re working with a contemporary home. You can also opt in for additional trim for added detailing. Just like how wainscoting covers the lower part of the home, crown molding instantly elevates the ambiance of the space effortlessly.
Read also – How to Remove Popcorn Ceilings in 7 Easy Steps
Illuminate with Recessed and Cove Lighting
Recess lights are placed within the tray ceiling to provide ambient and accent lighting. The soft diffused glow will make the space warm and close to the heart. Ideal for family rooms and bedrooms, where people relax. These lights also emphasize the architectural beauty of the tray ceilings and play around with lights and shadows. To take the lighting up a notch, you can add cove lighting by using LED lights or rope lights.
Cove lighting greatly reduces the glare you get from light bouncing off the walls and ceiling, which makes the space comfortable and mellow, ideal for relaxation. If you’re using cove lighting in the family room where you get together often with friends and extended family, you don’t have to worry about bringing in new lights. Since you’re using LED lights, position them differently or change the color and temperature of the lights to suit the mood you want to set.
You might be surprised to know how well cove lights can improve the perceived home value and become the focal point of the space.
Create a Focal Point with Medallions and Fans
Make a stunning difference in your tray ceiling by installing a ceiling medallion around the light fixture you finalize to be placed inside the tray ceiling. You can also go for ceiling fans with decorative blades and lighting kits, to add a metallic touch and boost the visual interest of the space.
Read also – 9 Benjamin Moore Paint Colors Designers Love
Expand Space with Mirrored Panels
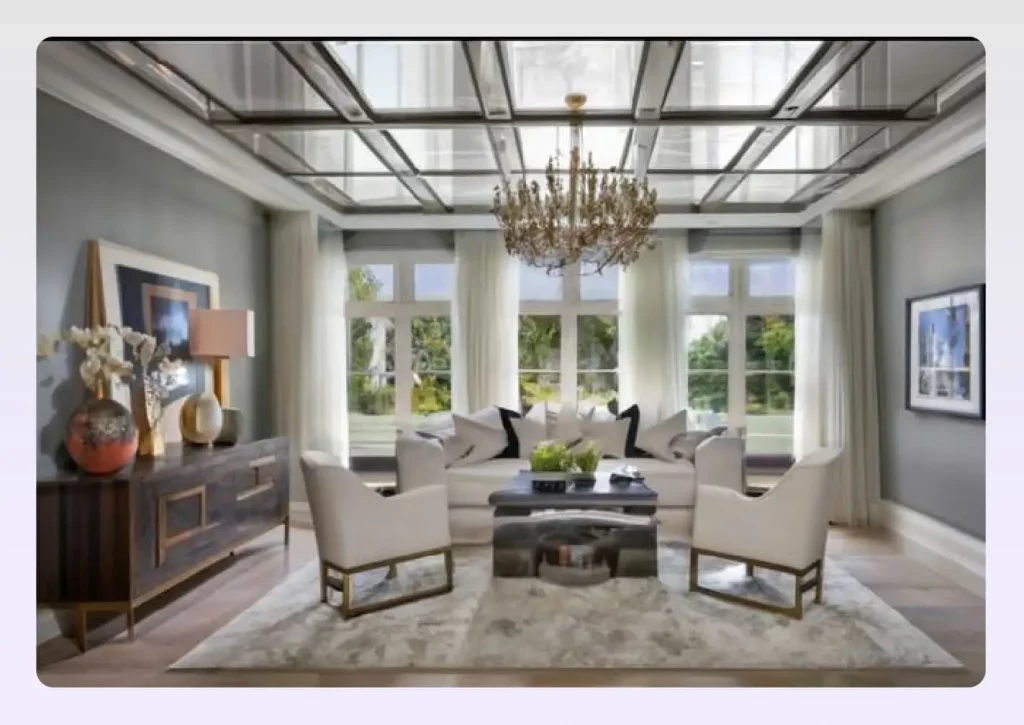
The mirrored panels reflect light and add spaciousness and glamour to the space. They add more depth and texture, even to a small room. Add them to any design style you want in place and they’ll complement them beautifully. Sky’s the limit if you want to customize the mirror panels based on the shape, location, and light exposure the tray ceiling design has in the room. Choose different shapes, framing, and dimensions of mirrored panels and play around with them.
They also give an illusion of ceiling height, so your tray ceilings will naturally look like high ceilings. There’s also the obvious benefit of using mirrors in ceiling design – they’re easy to clean and maintain.
Integrate Natural Light with Skylights
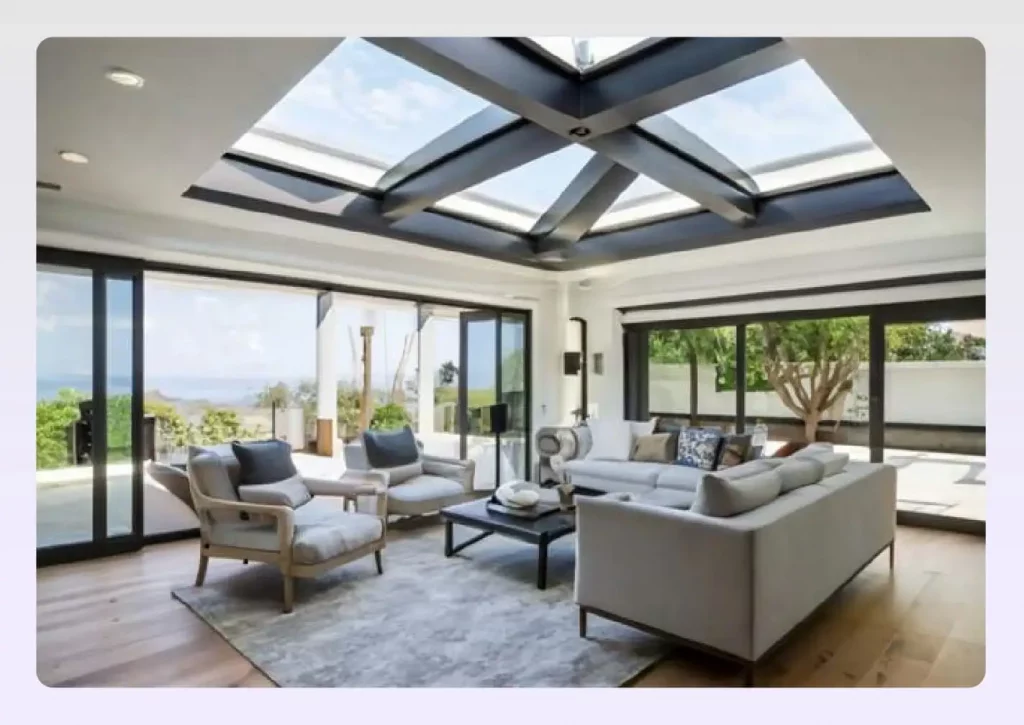
Install skylights within your tray ceiling to bring in a touch of natural beauty and blur the lines between indoors and outdoors. Design skylights with proper insulation and you can massively reduce the family’s electricity bill. How? Skylights can offer passive heating and cooling in winters and summers respectively, and contribute to energy efficiency.
For better ventilation and improved comfort, consider air vents or grills. They also improve the air quality in the room you’re in. Get as much natural light as possible, especially in places like bedrooms, to keep allergens away.
Read also – 27 Dorm Room Decorating Tips For A Trendy 2024
Use Paint, Wallpaper, and Accent Colors
The paint or wallpaper you use has to match the color scheme of the room. Designers often choose white for ceilings, as it reflects light and enhances the other colors in the room. If you want to do that, just make sure you use the colors that agree with the undertones.
If you opt for color drenching, painting the entire room in one color, light shades are preferable. Dark colors in this style can dampen the mood. If using dark hues, consider different finishes of the same color to add contrast.
One of the most fascinating ways to spice up the design of the space is painting the ceiling in an accent color. Simple, bold shades that fit the color palette are the ultimate go-to, but you can also go for glitters, sparkles, and high gloss effects for a more whimsical effect.
Wallpapers are also an excellent option, they suit any style, be it traditional, transitional, contemporary, or coastal homes. Be careful to choose patterns and colors that work harmoniously with other design elements in the space, and your design will turn out fantastic.
Add Texture with Decorative Tiling
Decorative molding in the form of tiles that can be installed in the ceilings gives you plenty of room to experiment with. They are versatile, and you can choose the patterns and level of intricate detailing in the tile depending on where you plan to use them – the entryway, dining room, living room, master bedroom, home offices, etc. They work well with traditional French or modern, Art Deco design, and contemporary designs.
Soften the Look with Fabric Ceilings
They’re also called tinted or canopy ceilings and are unique showstopping choices that are trending among homeowners all over the world. Use them generously for traditional, Victorian, and Bohemian styles. Patterns available to choose from are pleats, gathers, or pulled-tight fabrics. They exude a luxurious look and give a sterling first impression.
They are naturally fire-resistant, don’t collect dust, great for soundproofing, and can be installed to make residents and guests fall in love with the home’s living room, dining room, and bedrooms.
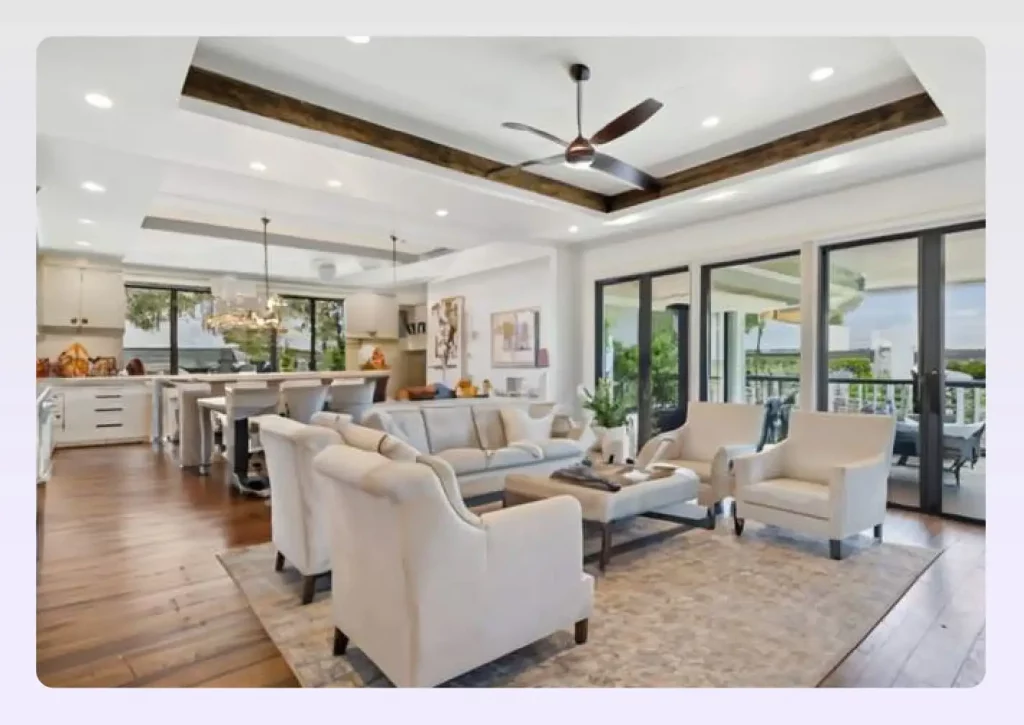
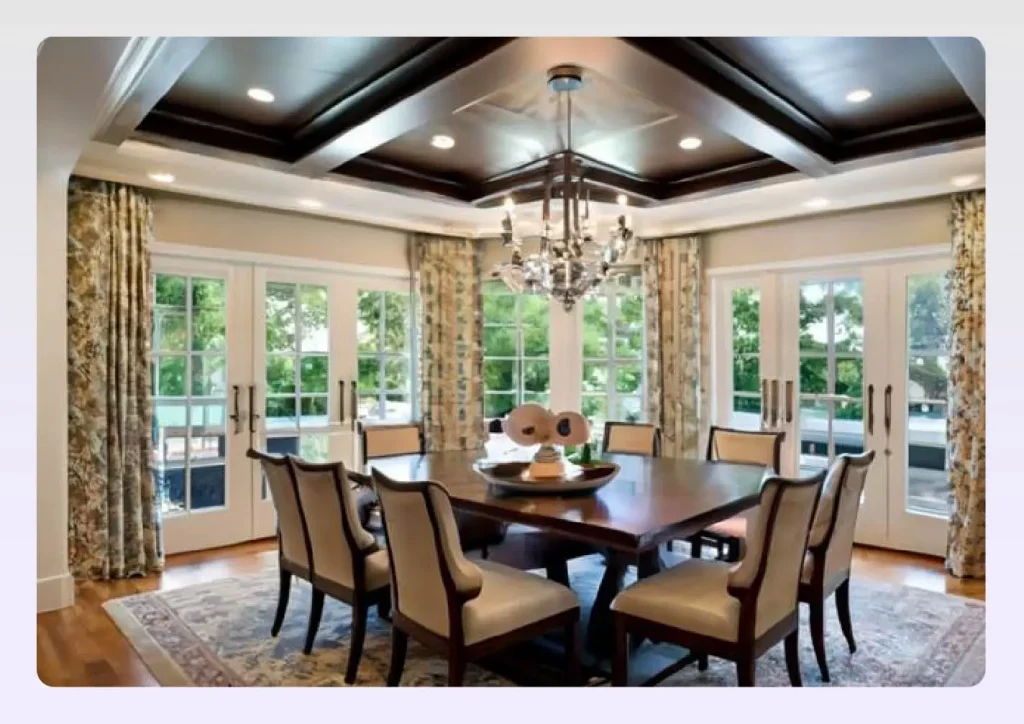
Incorporate Rustic Wooden Beams
Introduce a warm, rustic charm by installing wooden beams within the recessed portion of your tray ceiling. This works especially well in modern farmhouse, transitional, or industrial design styles. The natural texture of the wood creates a stunning contrast against a smooth, painted ceiling, adding character and a cozy ambiance to the room.
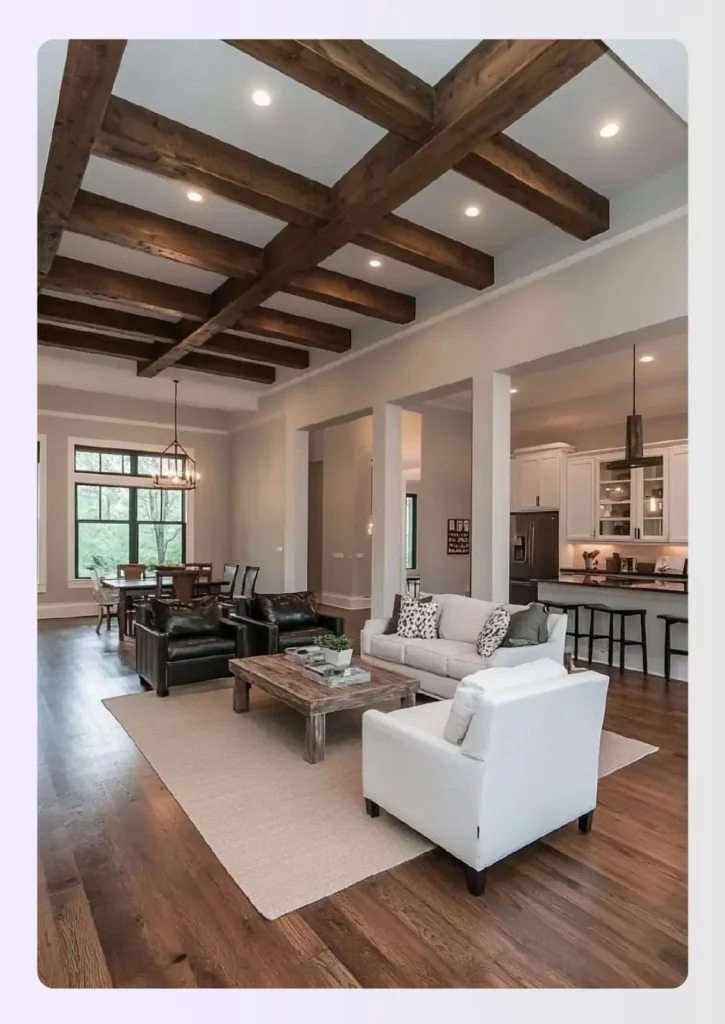
Image Credit: Pinterest
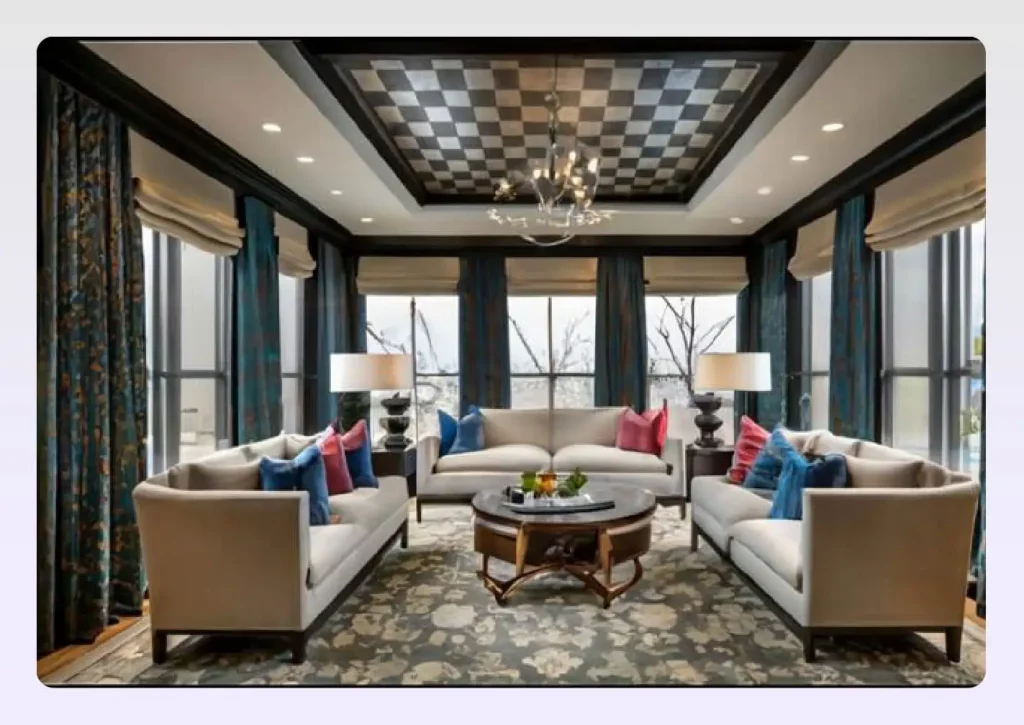
Create Drama with Geometric Patterns
For a bold and contemporary statement, design a geometric pattern within the tray. Use wood trim, molding, or contrasting paint colors to create interlocking squares, diamonds, or other abstract shapes. This technique transforms the ceiling into a major design feature and is one of the most impactful modern tray ceiling ideas.
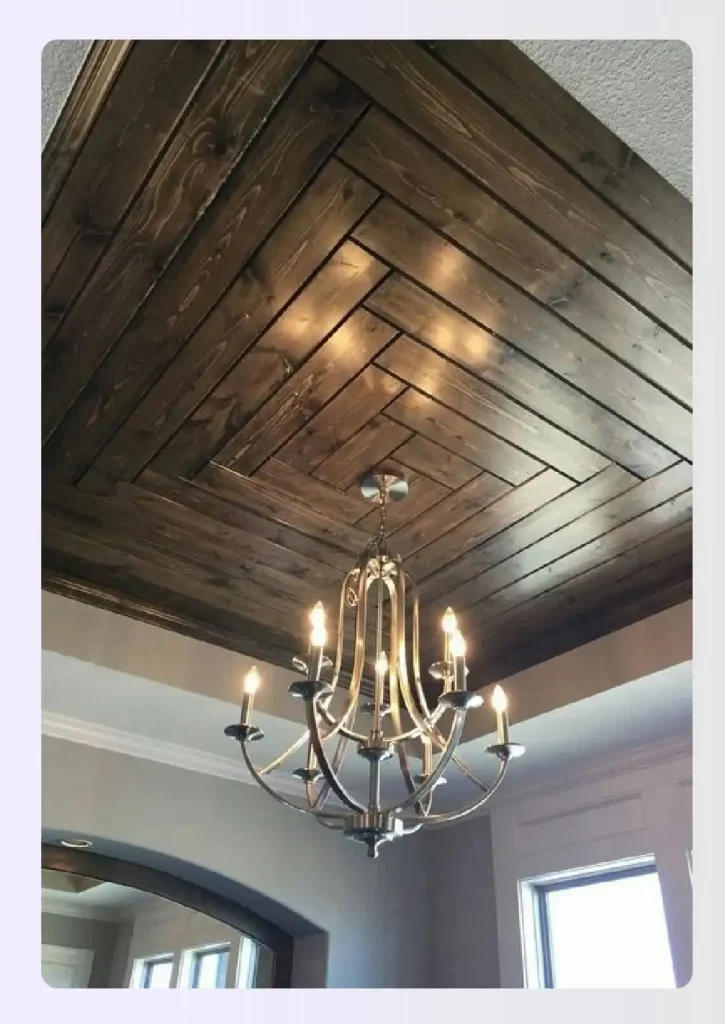
Image Credit: Pinterest
Apply a Textured Finish
Move beyond flat paint and apply a textured finish like Venetian plaster, grasscloth, or a metallic treatment to the recessed ceiling area. A textured finish adds subtle depth and a layer of luxury, catching the light in unique ways to create a dynamic and sophisticated effect that enhances the overall room design.
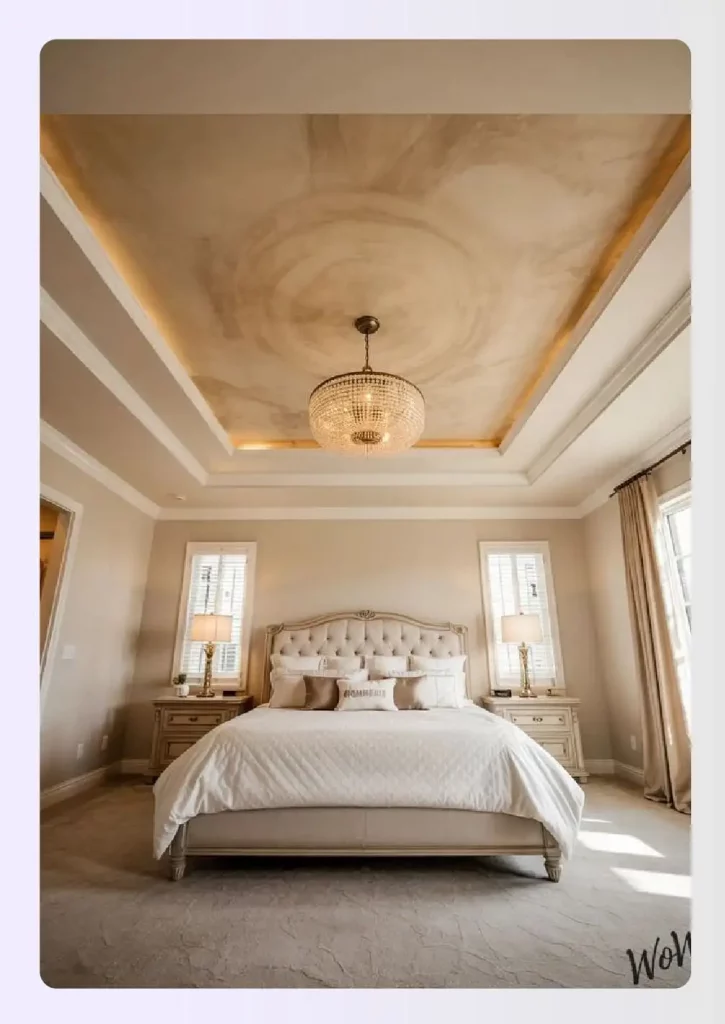
Image Credit: Pinterest
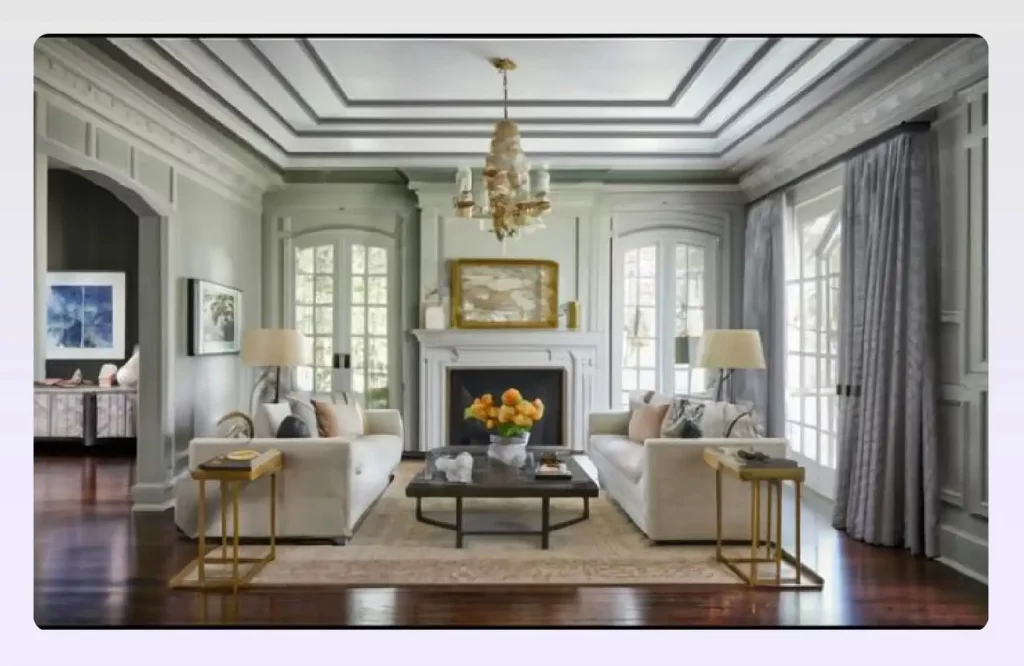
Define with Contrasting Trim
A simple yet highly effective idea is to paint the trim or the different “steps” of the tray ceiling in a color that contrasts with the main ceiling and the walls. A dark trim on a light ceiling, or vice-versa, sharply defines the architectural lines of the feature, making it pop and drawing the eye upward.
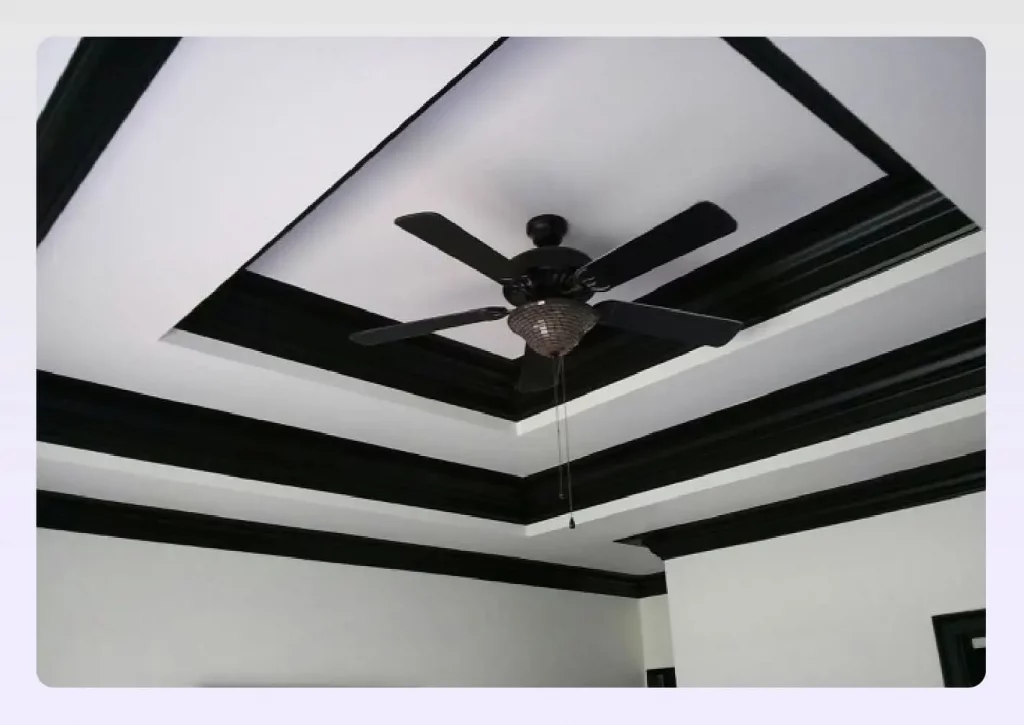
Image Credit: Pinterest
Factors to Consider Before a Tray Ceiling Installation
Here are the crucial factors you must consider before opting for a tray ceiling installation:
- Ceiling Height: Tray ceilings are best suited for rooms with existing ceilings of at least eight feet. Anything lower might feel cramped after the perimeter is dropped.
- New Construction vs. Remodel: Installing a tray ceiling is significantly easier and more cost-effective during new construction. Remodeling requires more labor to work around existing structures.
- Hidden Obstacles: Before starting, be aware of any wiring, plumbing, or ductwork (HVAC) that runs through the ceiling joists, as these may need to be rerouted.
- Shape and Depth: While rectangular or square trays are most common, you can also opt for circular or oval shapes. The depth is typically 6-12 inches but should be proportional to the room size.
- Lighting: Consider the type of lighting you want before installation, as it may require additional wiring and planning. This is a crucial step in any tray ceiling installation guide.
- Cleaning: The ledges and recessed areas can collect dust. Be prepared for regular dusting, which may require a ladder or an extension tool.
Create the Most Attractive Design Tray Ceilings with Foyr Neo

Step 1: Sign up for Foyr Neo’s 14-day free trial.
Step 2: Import the floor plan or create one afresh with the best 2D and 3D views.
Step 3: Select the portion of the ceiling you want to build tray ceiling on and draw a rectangle with our rectangle tool.
Step 4: Use the push and pull tools to create the step-like pattern, the trait of tray ceilings, and create a sense of depth.
Step 5: Add cove lighting or recess lighting by tracing the path of the lights in the tray ceilings, while being guided by AI to get dimensions and spacing right.
Step 6: Increase or decrease the depth of the cavity of the tray ceiling easily by viewing it in 2D and 3D and switching between them seamlessly.
Step 7: Choose from our vast material library and pick out decorative elements like fabric ceilings, ceiling fans, or lights in any color, pattern, texture, and style you want and incorporate them easily.
Step 8: Change your POV and view even tiny details of the tray ceiling in accurate detail, up close.
Step p: When everything is right in its place, go ahead and take a preview from 360 degrees and generate lighting-fast renders, to impress your clients.
Wanna try your hand at designing stunning spaces, that have functionality and aesthetics infused in them? Sign up for Foyr Neo’s 14-day free trial now.
Frequently Asked Questions (FAQs)
1. Can tray ceilings be adapted for outdoor spaces, such as covered patios?
Yes, weather-resistant materials can be used to create tray ceilings in covered outdoor areas.
2. What lighting options work best with tray ceilings?
Recessed lighting in both tray ceilings and recessed ceilings, pendant lights, or LED strips are popular choices for illuminating tray ceilings and creating a dramatic effect. Chandeliers also work well.
3. How do tray ceilings impact the resale value of a home?
Homes with well-designed tray ceilings may have increased resale value due to enhanced aesthetics.
4. What impact do tray ceilings have on acoustics in a room?
Tray ceilings can either enhance or diminish acoustics based on the materials used; softer materials may improve sound absorption.
5. Can tray ceilings help in defining different zones within an open-concept space?
Yes, tray ceilings can visually delineate spaces, creating a sense of separation in open floor plans.
6. What is the difference between a pan ceiling and a tray ceiling?
A pan ceiling typically consists of a single, large inverted “pan” that covers most of the ceiling area. A tray ceiling is distinguished by its border, creating a step-like effect with one or more recessed levels. While similar, the tray design often offers more pronounced depth and architectural detail.
7. How to make a tray ceiling look better?
Enhance a tray ceiling by using contrasting paint colors to highlight its different levels. Installing crown molding adds elegance, while cove lighting creates a warm, ambient glow. For a dramatic effect, consider adding wallpaper, a textured finish, or a central medallion to the recessed portion of the ceiling.
8. Can you add a tray ceiling to an existing ceiling?
Yes, this is a common renovation project. The standard method for how to add a tray ceiling to an existing room involves building a soffit or framework that drops down from the existing ceiling. This creates the lowered perimeter and the illusion of a raised central section without altering the home’s primary structure.
9. How deep should a tray ceiling be?
The ideal depth for a tray ceiling depends on the room’s overall height. For a standard 8-foot ceiling, a depth of 6-8 inches is common. In rooms with 9-foot or higher ceilings, the depth can increase to 10-12 inches or more to create a more dramatic effect while still maintaining ample headroom.
10. How much does it cost to build a tray ceiling?
The question of how much does it cost to add a tray ceiling varies greatly. A simple DIY project might cost a few hundred dollars in materials. Professionally, a basic rectangular tray ceiling can cost between $3 to $5 per square foot, with total costs often ranging from $750 to $2,500+ depending on size, complexity, lighting, and labor rates in your area.