Learn » Interior Design Styles »
Are you tired of staring up at those outdated and unsightly popcorn ceilings in your home? Don’t worry, you’re not alone. Many homeowners are looking for ways to remove this textured finish and give their ceilings a fresh, modern look. In this article, we will guide you through the process of removing popcorn ceilings in 7 easy steps, helping you transform your space and bring it up to date.
 Understanding Popcorn Ceilings

Before we dive into the removal process, let’s take a moment to understand what popcorn ceilings are and why many homeowners choose to remove them.
A popcorn ceiling, also known as a stippled or acoustic ceiling, gained popularity in the mid-20th century. It was primarily used to hide imperfections and reduce noise. However, over time, this textured finish has fallen out of favor due to its dated appearance and potential health risks. Popcorn ceilings have an interesting history that dates back to the 1950s. They were initially developed as a cost-effective solution for builders to quickly cover up any flaws or irregularities in the ceiling surface. The texture was achieved by mixing a combination of water, adhesive, and small Styrofoam or vermiculite particles. This mixture was then sprayed onto the ceiling, creating a bumpy, rough texture that resembled cottage cheese or, as the name suggests, popcorn.
While popcorn ceilings were once a popular choice, they can make a room feel outdated and give it a less spacious appearance. The texture tends to collect dust and cobwebs, making it difficult to clean. Additionally, if your home was built before 1980, there is a chance that your popcorn ceiling contains asbestos, a hazardous substance that can cause serious health issues when airborne particles are inhaled. Asbestos was commonly used in construction materials until its harmful effects were discovered. It was added to popcorn ceilings for its fire-resistant properties. However, when disturbed, such as during renovations or repairs, asbestos fibers can become airborne and pose a significant health risk. Therefore, removing popcorn ceilings becomes a crucial step in ensuring the safety of your home and the well-being of its occupants.
Given these reasons, many homeowners opt to remove popcorn ceilings to improve the aesthetics and safety of their spaces. Removing a popcorn ceiling can be a challenging and messy task, but with the right tools, techniques, and precautions, it can be accomplished successfully.
Read also – Why Do Professional Interior Designers Need Home Decor Design Software?
Preparing for the Removal Process
Now that you understand the need to remove your popcorn ceiling, it’s time to get prepared for the process. Before you dive in, there are some safety measures to consider, as well as a list of necessary tools and materials. Removing a popcorn ceiling can be a challenging task, but with the right preparation, it can be done efficiently and safely. By following these guidelines, you’ll be well-equipped to tackle the removal process.
Safety Measures to Consider
When removing a popcorn ceiling, it’s essential to prioritize your safety. Asbestos is a potential risk, so it’s recommended to test for its presence before starting the removal process.
Asbestos, a naturally occurring mineral fiber, was commonly used in popcorn ceilings until the late 1970s. Inhalation of asbestos fibers can lead to serious health issues, including lung cancer and mesothelioma. Therefore, it’s crucial to take the necessary precautions to protect yourself and your loved ones. In addition to testing for asbestos, it’s advisable to wear protective clothing, gloves, goggles, and a mask to prevent inhaling any dust or debris during the removal process. These safety measures will help minimize your exposure to potentially harmful substances.
Necessary Tools and Materials
To successfully remove a popcorn ceiling, you’ll need a few tools and materials. These include:
- A sturdy ladder: This will allow you to reach the ceiling safely and effectively.
- Plastic drop cloths: Use these to protect your floors and furniture from dust and debris.
- A spray bottle filled with water: Spraying the ceiling with water will help loosen the popcorn texture, making it easier to remove.
- A putty knife or scraper: This tool will be used to scrape off the popcorn texture from the ceiling surface.
- A sanding pole with sandpaper: After removing the popcorn texture, you may need to sand the ceiling to ensure a smooth finish.
- Painter’s tape: Use this to protect the walls and other surfaces from accidental damage during the removal process.
- Primer: Applying a primer to the ceiling before painting will help the paint adhere better and provide a more professional-looking finish.
- Paint: Once the ceiling is prepped and primed, you can apply a fresh coat of paint to give your room a new and updated look.
Having these tools and materials ready before you begin the removal process will save you time and ensure that you have everything you need to complete the job effectively.
Read also – How to Create the Best Architect Portfolio in 2024
Step-by-Step Guide to Removing Popcorn Ceilings
Are you tired of the outdated popcorn texture on your ceiling? Don’t worry, we’ve got you covered! In this step-by-step guide, we will walk you through the process of removing your popcorn ceiling and transforming it into a smooth, modern masterpiece. So, roll up your sleeves and let’s get started!
Step 1: Room Preparation
Before you embark on your popcorn ceiling removal journey, it’s essential to prepare the room properly. Start by removing all furniture from the space. This will not only give you more room to work but also protect your beloved belongings from dust and debris. Once the room is clear, cover the floors and any remaining items with plastic drop cloths. This simple step will ensure that no unwanted particles find their way into your furniture or flooring.
Step 2: Testing for Asbestos
If your home was built before 1980, it’s crucial to test your popcorn ceiling for asbestos. Asbestos, a hazardous material commonly used in construction, can be found in older homes. To determine if your ceiling contains asbestos, you can purchase a testing kit or hire a professional to collect a sample and have it analyzed. Remember, safety should always be your top priority. If asbestos is present, it’s recommended to hire a professional asbestos abatement team to safely remove it.
Step 3: Wetting The Ceiling
Now that you’ve taken the necessary precautions, it’s time to start the removal process. Prior to scraping, use a spray bottle filled with water to thoroughly wet a small section of the ceiling. This step is crucial as it helps loosen the popcorn texture, making it easier to remove. Plus, it minimizes the amount of dust generated during the process, keeping the air cleaner and healthier.
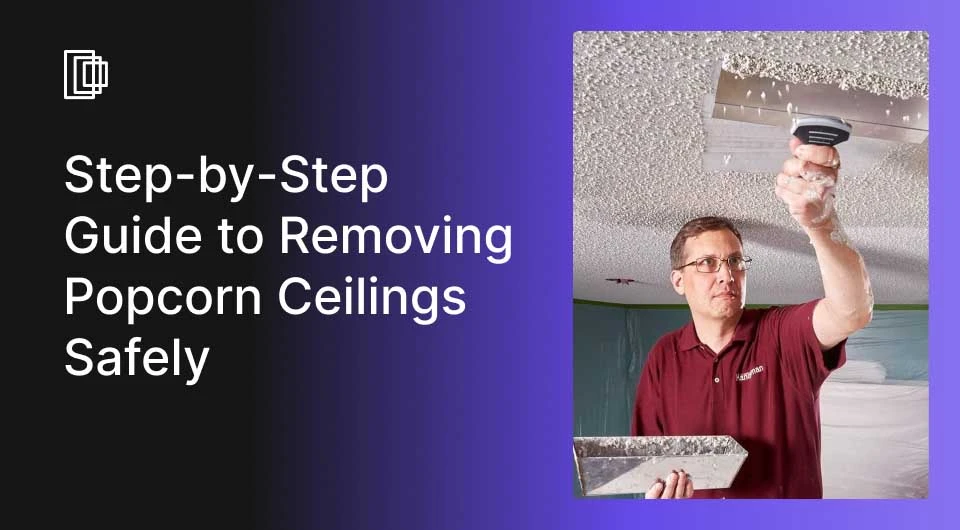
Step 4: Scraping Off the Popcorn Texture
With your putty knife or scraper in hand, it’s time to start scraping off the wet popcorn texture. Begin in one corner of the ceiling and work your way across in small sections. Be gentle and patient to avoid damaging the underlying drywall. Remember, slow and steady wins the race! Take breaks as needed to rest your arms and maintain your focus. This step may require some elbow grease, but the end result will be worth it.
Step 5: Sanding the Ceiling

Once you’ve removed the majority of the popcorn texture, it’s time to smooth out any remaining imperfections. Grab a sanding pole and attach sandpaper to it. Carefully sand the ceiling, paying attention to any uneven areas. This step will ensure a seamless finish and prepare the ceiling for painting. Remember to wear a dust mask and protective eyewear to shield yourself from any particles that may be released during sanding.
Step 6: Priming and Painting
Before you can admire your newly textured-free ceiling, there’s one more important step to complete. Apply a coat of primer to the ceiling using a roller or brush. Priming is crucial as it helps seal the surface and provides a better finish for the paint. Once the primer is dry, it’s time to unleash your creativity and paint your ceiling with the color of your choice. Opt for a paint roller with an extension pole to make the application process easier and more efficient. Let your personal style shine through!
Step 7: Clean-up and Disposal
Congratulations, you’ve successfully removed your popcorn ceiling and transformed your space! Now it’s time to wrap up the project with some clean-up. Carefully remove the drop cloths, making sure not to spread any dust or debris around. Dispose of them along with the scraped popcorn texture in appropriate trash bags. It’s important to follow your local regulations for disposal. Finally, give the room a thorough cleaning, removing any remaining dust or debris. Once everything is sparkling clean, move your furniture back in place and bask in the glory of your newly transformed space!
Read also – 34 Beautiful Modern Kitchen Design Ideas for 2024
Common Mistakes to Avoid
Now that you know the essential steps for removing popcorn ceilings, it’s crucial to be aware of common mistakes that homeowners often make during this process.
Over-Scraping:
-
- One prevalent mistake is over-scraping the ceiling.
- While removing the popcorn texture is important, avoid overdoing it.
- Over-scraping can damage the underlying drywall, necessitating additional repair work.
- To prevent this, work in small sections and use a gentle scraping technique for a smooth and intact surface.
Neglecting Safety Precautions:
-
- Safety is paramount, yet homeowners sometimes neglect crucial precautions.
- Popcorn ceiling removal can release harmful substances like asbestos.
- Before starting, test for asbestos and hire a professional if present.
- Even if asbestos is absent, always wear protective gear (goggles, gloves, mask) to minimize dust exposure.
- Follow safety guidelines, including proper ventilation and keeping children and pets away from the workspace.
By following these easy steps and avoiding common mistakes, you’ll be able to remove your popcorn ceilings safely and efficiently, transforming your home and giving it a fresh, modern look. Removing popcorn ceilings not only improves the aesthetics of your space but also eliminates potential health risks associated with older textured ceilings. So, grab your tools, put on your safety gear, and get ready to say goodbye to those outdated popcorn ceilings once and for all!

Conclusion
Transform your space with Foyr Neo, where you can visualize your dream home with or without popcorn ceilings! Access our cutting-edge features for a photorealistic, fast, and smooth design process. Embark on an exciting design adventure and see your ideas come to life. Ready to unleash your creativity? Start your design journey by signing up now for a 14-day free trial today!
Frequently Asked Questions
1. How much does it cost to remove popcorn ceilings?
The cost to remove the popcorn ceiling varies depending on the room size and complexity, but generally ranges from $1 to $3 per square foot.
2. Is it a good idea to remove popcorn ceilings on your own?
Removing a popcorn ceiling yourself can save money, but it’s a labor-intensive, messy job that may require dealing with asbestos.
3. Are popcorn ceilings bad for your health?
Older popcorn ceilings (pre-1980s) can contain asbestos, which is unhealthy when disturbed, but modern ones are usually safe.
4. Why are so many people removing popcorn ceilings?
People often remove popcorn ceilings because they are hard to clean, out of style, and can reduce a home’s resale value.
5. Why do interior designers hate popcorn ceilings?
Designers generally dislike popcorn ceilings as they tend to look dated, can make a space appear darker, and are difficult to repair or paint over.
6. How much does it cost to remove popcorn ceiling?
Popcorn ceiling removal generally costs between $1 and $3 per square foot, depending on the room size, ceiling height, and complexity. DIY removal is cheaper, but hiring professionals ensures safety, especially in asbestos cases.
7. Is it a good idea to remove a popcorn ceiling?
Yes, removing popcorn ceilings improves home aesthetics, makes cleaning easier, and can increase resale value. However, test for asbestos before removal. Tools like Foyr Neo let you visualise smoother finishes before starting the project.
8. How long will it take to remove a popcorn ceiling?
The time required depends on the room size and ceiling condition. A standard room typically takes one to two days for scraping, sanding, and repainting. Extra time may be needed if asbestos is present.
9. Do popcorn ceilings reduce home value?
Yes, popcorn ceilings can reduce home value as they look outdated, are harder to clean, and may signal asbestos risks in older homes. Many buyers prefer modern, smooth ceilings, making removal a worthwhile investment.
10. How do I know if my popcorn ceiling has asbestos?
Homes built before 1980 may contain asbestos in popcorn ceilings. The only reliable method is professional testing or lab analysis of a sample. If asbestos is present, hire certified abatement experts for safe removal.