Designing a modern primary bathroom layout requires interior designers to juggle stubborn plumbing stacks and demanding client expectations daily. You must create an inviting personal retreat within a restricted space while following the current residential building codes.
Here are 15 specific primary bathroom floor plans to help you maximize daily functionality and visual appeal in your projects.

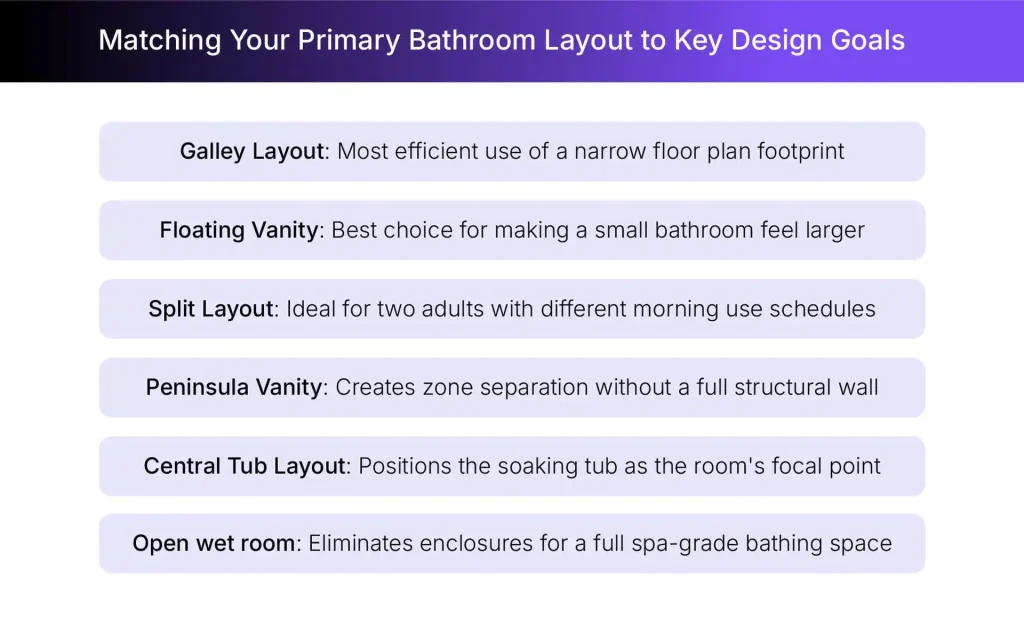
Essential Dimensions Every Primary Bathroom Layout Must Meet
Getting these numbers wrong early in a project can lead to expensive rework later, so I strongly recommend pinning this reference to your design brief before you sketch anything.
- 21 inches: The IRC and ANSI A117.1 code sets 21 inches as the minimum clear floor space in front of a toilet for standard non-accessible residential designs. For accessible primary bathroom layouts, you must increase this measurement to 30 inches to meet ADA-compliant requirements and current accessibility standards.
- 36 by 36 inches: A 36 by 36-inch shower gives your client the bare minimum floor space to stand and turn comfortably inside the enclosure. I recommend pushing this to at least 36 by 48 inches whenever the overall square footage allows.
- 36 inches: A clear 36-inch corridor between your main vanity and the bathtub prevents the layout from feeling cramped during daily morning use. This clearance also lets two people move around freely.
- 60 inches: A double vanity needs at least 60 inches of total width to give each user enough counter space for grooming items and morning essentials. Many designers I’ve worked alongside prefer 72 inches whenever the primary bathroom floor plan allows for a wider unit.
- 32 inches: A standard bathroom door requires at least 32 inches of clear swing space before it contacts any adjacent fixture or bathroom wall surface. For accessible primary bathroom designs, plan for a full 36-inch door width to meet current residential accessibility guidelines.
1. The Space-Saving Corner Shower Layout

Placing the shower into a corner frees up the central floor area for the vanity and toilet zone, making it one of the most efficient bathroom layout ideas for a tight space. It works best in square rooms where an inline configuration would consume most of the available floor plan.
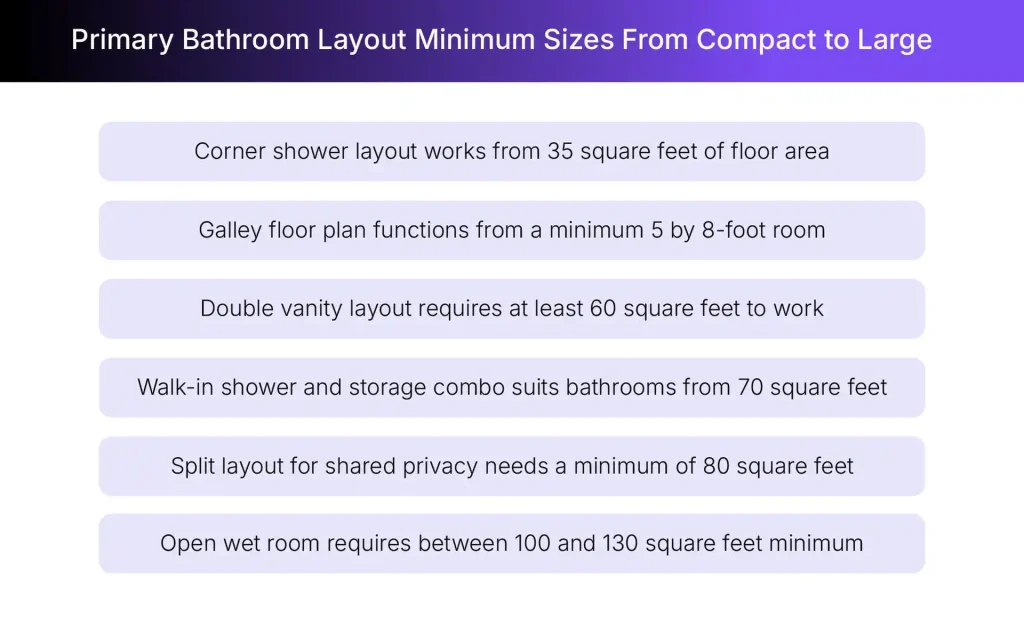
Minimum Size: This layout fits bathrooms from 35 to 40 square feet with a corner shower and single vanity on adjacent walls. Keep a 36-inch clear path between the shower entry and the vanity.
Design Suggestions:
- Mount the vanity directly opposite the corner shower for a balanced visual approach.
- Use a frameless glass door to keep the bathroom feel open and connected throughout.
- Position the toilet between the vanity and shower to consolidate plumbing fixture placement.
2. The Narrow Space Galley Floor Plan

A galley primary bathroom layout arranges fixtures along two parallel walls, making it the most practical solution for elongated rooms with limited width. This is an ideal bathroom floor plan for older homes and urban apartments where the bathroom renovation budget doesn’t allow structural changes to the existing footprint.
Minimum Size: A galley bathroom fits a 5 by 8-foot room, placing fixtures on two parallel walls for maximum efficiency. The corridor between them must stay at least 36 inches wide.
Design Suggestions:
- Install the toilet and shower on the same wall to consolidate plumbing and reduce costs.
- Use wall-mounted cabinetry and floating shelves to preserve the limited corridor floor space.
- Add a full-length mirror to visually expand the tight space and reflect available light.
Pro tip: Swap the hinged door for a pocket door and enjoy more usable square footage without touching any plumbing.
3. The Floating Vanity and Open Floor

Source: Pinterest, Architico
A wall-mounted floating vanity lifts the cabinet off the floor, making the room feel larger than the actual square footage. This primary bathroom design works well for clients who want a spacious modern look without expanding the footprint or relocating any plumbing fixtures.
Minimum Size: This layout works from 45 square feet, leaving visible floor space beneath the cabinet to give the room an open and lighter feel. Mount the vanity 32 to 36 inches above the floor.
Design Suggestions:
- Install floor heating beneath the open section to warm the exposed flooring area below.
- Select an undermount or vessel sink to keep the counter surface visually clean throughout.
- Choose wall-mounted faucets to extend the floating aesthetic across the visible plumbing fixtures.
4. The Enclosed Toilet Privacy Plan

Separating the toilet into its own private room transforms how a shared master bath functions during busy mornings. Two people can use different bathroom areas at the same time, which makes this primary bathroom floor plan a consistent favourite for family homes and properties with multiple daily occupants.
Minimum Size: You will need 55 to 60 square feet to fit a separate toilet room alongside the shower and vanity. The toilet compartment requires a 30 by 60-inch minimum footprint to meet residential code.
Design Suggestions:
- Install a sturdy pocket door on the water closet to save valuable floor space.
- Add localized ventilation directly above the toilet to manage moisture and odors.
- Position the main double vanity right outside the enclosure for immediate washing access.
The Classic Double Vanity Layout

A double vanity dedicates the room’s longest wall to a shared sink counter, giving two people their own defined zones and plenty of counter space for individual morning routines. It removes daily friction in a shared basin, making it one of the most-requested primary bathroom design configurations for couples and families alike.
Minimum Size: This layout needs at least 60 square feet to fit a 60-inch double vanity with adequate clearances on all sides. Plan for a 7 by 9-foot room if adding a separate shower enclosure.
Design Suggestions:
- Place the vanity along the room’s longest solid wall for maximum counter run and stability.
- Position the shower opposite the vanity wall to create a visually balanced primary bathroom layout.
- Incorporate layered lighting above the mirrors to eliminate harsh shadows during grooming routines
If you want to see how to design a luxury bathroom easily, this video walks you through the process from a blank room to a finished layout in real time.
6. The Walk-In Shower and Storage Combo

Combining a large open shower with built-in storage niches along one wall eliminates the need for a separate linen cabinet in the primary bathroom. This configuration suits clients who want a full bath experience without dedicating additional floor space to standalone shelving or freestanding furniture units.
Minimum Size: This layout needs at least 70 square feet, with the walk-in shower at a minimum of 36 by 48 inches. Add 18 extra inches of depth to the back wall for built-in storage niches.
Design Suggestions:
- Extend your shower floor tile into the main room to create a cohesive look.
- Include a built-in shower bench to elevate the daily bathing experience for clients.
- Design custom items like recessed shelving to keep shower products hidden from view.
Pro tip: Radiant floor heating inside the shower zone is a detail clients consistently rate as their favourite addition.
7. The L-Shaped Corner Layout

An L-shaped primary bathroom arranges fixtures along two adjacent perpendicular walls, using the corner junction for the shower or soaking tub rather than leaving it as underused space. This bathroom layout idea handles irregular room shapes well and suits rooms where an existing corner window already creates a natural spatial break.
Minimum Size: An L-shaped configuration requires at least 75 square feet to provide adequate clearance for both fixture walls without forcing tight approaches.
Design Suggestions:
- Place the main vanity along the shorter leg of the L for immediate access.
- Position the shower enclosure deep inside the longer leg for maximum visual privacy.
- Use consistent flooring tile throughout both sections to maintain a cohesive visual flow.
- Install a large skylight near the shower to bring natural light into darker corners.
8. The Split Layout for Shared Privacy
A split primary bathroom layout separates the shower and tub wet zone from the dry zone with the vanity and toilet, allowing two people to use the bathroom simultaneously without interfering with each other. It’s my preferred recommendation for any master bath serving two adults with different morning schedules and routines.
Minimum Size: A split layout works best in primary bathrooms with at least 80 square feet to create two functional zones with adequate clearance in each. Plan for a minimum room width of 8 feet.
Design Suggestions:
- Place the central grooming station near the main entrance for quick and easy access.
- Enclose the toilet and shower in separate adjacent rooms to maximize overall functional privacy.
- Provide ample counter space in the central hub to accommodate multiple grooming items simultaneously.
9. The T-Shaped Room Layout

A T-shaped primary bathroom layout features a central entry corridor that opens into two distinct zones at the far end, with the soaking tub and shower positioned on opposite sides for balance. It handles irregular room shapes well and works naturally when existing structural elements already create a T-shaped spatial division.
Minimum Size: A T-shaped layout needs at least 80 square feet so both terminal zones function without tight clearances.
Design Suggestions:
- Position your primary vanity immediately opposite the doorway to create an inviting visual view
- Tuck the toilet behind a half wall on the left side for added visual privacy
- Place the freestanding soaking tub on the right side to balance the room visually
- Install electric radiant floor heating to elevate the luxury factor throughout the entire space
10. The Window-Facing Tub and Shower

Positioning a soaking tub to face a window brings natural light and an outdoor connection into the bathing experience in a way no artificial lighting can replicate. This layout works best when the window overlooks a private garden and the bathroom renovation budget allows repositioning the existing opening in the wall.
Minimum Size: This layout works in primary bathrooms from 85 square feet, depending on whether you are featuring the tub, the shower, or both fixtures.
Design Suggestions:
- Use frosted glass on the lower window pane to preserve privacy in the tub zone.
- Extend the window trim from the sill to the ceiling to amplify the room’s full vertical height.
- Select forest green or charcoal tile behind the window wall for a strong visual contrast.
11. The Peninsula Double Vanity Layout

A peninsula double vanity projects from one wall into the bathroom space, acting as a natural room divider between the bathing area and sink zone. This primary bathroom layout adds genuine architectural interest and gives each user a defined side of the vanity without building a full partition wall between zones.
Minimum Size: A peninsula layout requires at least 85 square feet, as the projecting counter needs clear circulation paths on two sides to avoid bottlenecking movement.
Design Suggestions:
- Suspend large mirrors above the peninsula to maintain sightlines across the entire bathroom space.
- Mount towel bars directly onto the peninsula ends to maximize your functional storage options.
- Use the secluded side of the peninsula to conceal your toilet from the doorway.
12. The Freestanding Tub as a Focal Point

A freestanding soaking tub placed within the primary bathroom layout serves as a sculptural centrepiece rather than a purely functional fixture, shifting the room’s character toward a personal retreat. This approach suits clients who prioritise the bath experience and want the tub to take center stage without visual competition from other fixtures.
Minimum Size: A freestanding tub works best in primary bathrooms from 90 to 100 square feet, with enough floor to circulate all four sides comfortably.
Design Suggestions:
- Keep the freestanding tub clear of all walls so it reads as a sculptural centrepiece.
- Choose an oval or slipper-style tub shape to reinforce the luxury primary bathroom aesthetic.
- Install the shower in a dedicated alcove so the tub’s surrounding sightlines stay clear.
- Use floor-to-ceiling stone tile behind the tub as the dedicated feature wall surface.
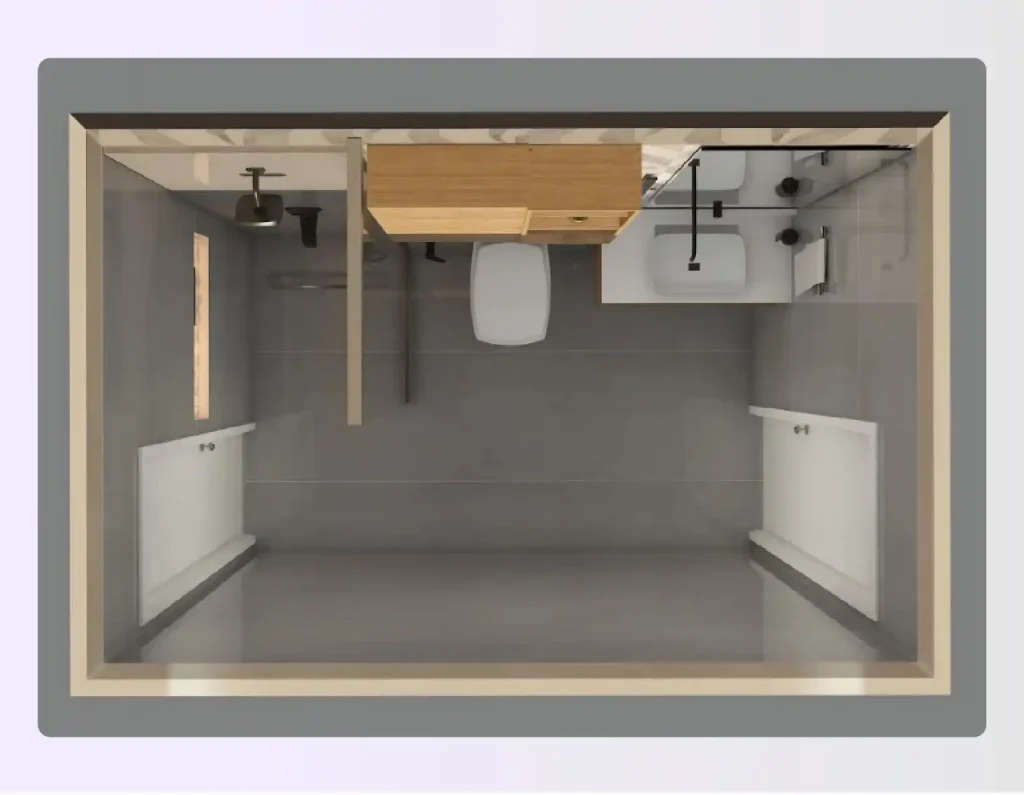
I always prefer visualizing such configurations in 3D before presenting them to clients during our consultations. Watch how you can create complete bathroom layouts in minutes with Foyr Neo:
13. The Central Tub and Dual Sinks

Placing a freestanding soaking tub at the centre of the primary bathroom layout makes it the undisputed focal point and creates a spa quality clients consistently respond to with genuine approval. A dual sink vanity along the opposite wall balances the visual composition while keeping the floor plan fully practical for daily use.
Minimum Size: A central tub layout needs at least 100 square feet to maintain clear paths around all four sides and a workable route to the vanity.
Design Suggestions:
- Keep 24 inches of clear floor space on each side of the freestanding tub for access.
- Place the dual sink vanity directly opposite the tub to balance the room’s visual weight.
- Tuck the toilet into an alcove or separate room so the soaking tub holds center stage fully.
14. The Luxurious Open Wet Room

A wet room primary bathroom layout eliminates the shower enclosure entirely, letting water drain across a shared tiled floor through a graded surface and a linear drainage channel built into the slab. This is the most technically demanding and expensive primary bathroom floor plan to execute, requiring full-room waterproofing throughout every tile surface.
Minimum Size: An open wet room needs 100 to 130 square feet to support drainage and complete waterproofing without the floor feeling persistently damp.
Design Suggestions:
- Grade the entire bathroom floor toward a linear drain along the wet zone boundary line.
- Use large-format tiles to minimise grout lines and simplify the full waterproofing installation process.
- Choose heated tiles across the entire bathroom space to manage moisture and add underfoot warmth.
15. The Open Concept Primary Suite

An open-concept primary bathroom removes the wall between the bedroom and bathroom, creating a unified suite in which the sleeping and bathing zones share a single connected floor plan. This type of bathroom design requires careful planning around privacy screens and ventilation before construction.
Minimum Size: An open concept suite needs a combined floor area of at least 250 square feet for the open connection to feel intentional rather than forced.
Design Suggestions:
- Use a low partition wall or freestanding screen to clearly define the wet zone boundary.
- Position the soaking tub to face the bedroom view so both zones read as visually unified.
- Choose large-format floor tiles extending from the bathroom into the bedroom for material continuity.

Typical Bathroom Sizes You Should Know
Knowing standard size ranges before you start helps you match the right bathroom layout to your client’s actual room.
Small Primary Bathroom
A small bathroom layout typically measures 35 to 55 square feet, corresponding to a room of 5 by 7 or 5 by 8 feet. A corner shower layout or a galley floor plan works best here because both configurations make the most of the constrained bathroom space.
Mid-Sized Primary Bathroom
A mid-sized primary bathroom covers 60 to 100 square feet, giving you enough floor space to separate the shower from the vanity zone. Develop two or three layout options in a bathroom design software like Foyr Neo as subtle configuration differences can significantly affect daily use.
Large-Sized Primary Bathroom
A large-sized primary bathroom plan provides 100 square feet or more of open area to create stunning architectural features. You have the ultimate freedom to include central tubs, expansive wet rooms, and dedicated makeup stations for your clients.
Bring Your Bathroom Vision to Life With Foyr Neo
Foyr Neo is a professional interior design software built for professional designers who need to move quickly from a client brief to a visualised primary bathroom layout. It combines 2D floor plan drafting and photorealistic 3D rendering in a single browser-based design tool without switching platforms.
- Draft accurate 2D bathroom floor plans and switch to 3D rendering to review spatial clearances and fixture proportions.
- Access thousands of bathroom fixtures and finishes to build detailed product lists within Foyr Neo for client presentations.
- Apply finish changes in real time so clients can see how each bathroom design decision reads on screen.
- Export complete bathroom plans from Foyr Neo to share with contractors and project managers without file conversion issues.
Whether you are refining a bathroom renovation or planning a large open wet room, design it in Foyr Neo first before starting building. Try Foyr Neo free for 14 days.
FAQs
What is a good size for a primary bathroom?
A comfortable master bathroom should provide around 80 to 100 square feet of usable floor space for utility. This generous sizing allows you to include a double vanity, a walk-in shower, and a private enclosed toilet room. You can still achieve excellent results in a tight space by selecting suitably scaled fixtures and utilizing clever vertical storage options.
What is the golden rule for bathroom layouts?
The golden rule is: never make the toilet the first thing visible when opening the bathroom door. You must always strive to position the vanity or a beautiful soaking tub directly in the primary sightline upon entry instead. Hiding the toilet behind a half-wall or within a pocket-door enclosure improves the overall bathroom feel.
What are common bathroom layout mistakes?
Failing to provide adequate clearance around swinging doors and vanity drawers remains the most frequent error made by novice designers. Many people also forget to plan for proper task lighting around mirrors during extensive bathroom renovation projects. Ignoring the need for dedicated linen storage forces clients to clutter their counter space with folded towels and heavy bathrobes.
What is a 6-fixture bathroom?
A 6-fixture bathroom represents the ultimate luxury configuration, featuring two separate sinks, a toilet, a bidet, a shower, and a tub. This extensive setup requires a massive floor plan to comfortably accommodate all these individual plumbing elements without feeling crowded. You can find this lavish arrangement only in high-end custom homes with generous square-footage budgets available for construction.
What do you call a bathroom with just a toilet and shower?
In real estate listings, professionals refer to a bathroom with only a sink, toilet, and shower as a three-quarter bath. This practical setup provides all necessary hygiene functions without dedicating the extra square footage needed to install a bulky bathtub.