Living in a studio apartment doesn’t mean sacrificing style or functionality. With the right floor plan and smart design choices, even the smallest studio can feel spacious, organized, and perfectly suited to your lifestyle.
In this guide, we’ll explore 10 proven floor plan layouts, share 20+ actionable design ideas, and show you how to avoid common mistakes that make small spaces feel cramped. By the end, you’ll have everything you need to transform your studio into a functional, stylish home.

What is a Studio Apartment Floor Plan?
A studio apartment floor plan is an open-concept living space that combines your bedroom, living room, and kitchen into one multi-functional area, with only the bathroom separated by walls. Think of it as a blank canvas where you have the freedom to define spaces according to your needs rather than being confined by traditional room divisions.
Unlike conventional apartments with separate rooms, studio floor plans embrace the open-concept philosophy. This layout has become increasingly popular in urban areas where maximizing every square foot is essential.
Pssst! Check out the below video quickly to see how you can design a studio apartment from scratch in Foyr Neo.
Key Features of Studio Apartments
Studio apartments share several defining characteristics that set them apart from traditional layouts:

- The main area flows freely without interior walls, creating an airy, uninterrupted floor plan that you can customize to your needs.
- The only fully enclosed room in a studio is usually the bathroom, which maintains privacy while keeping the rest of the space open and flexible.
- Most studios feature a kitchenette or galley kitchen along one wall or in a corner, often with compact appliances and limited counter space designed for efficiency.
- Many studios have limited built-in storage, requiring creative solutions for organizing clothing and belongings.
- Without walls dictating room functions, you can arrange furniture and use dividers to create distinct areas for sleeping, working, dining, and relaxing.
With these key features in mind, understanding the actual size of studio apartments helps you set realistic expectations for what you can fit and how you’ll use the space.
Typical Studio Apartment Dimensions and Square Footage
Studio apartments come in various sizes, but understanding typical dimensions helps you plan effectively:
| Studio Type | Square Footage | Typical Dimensions | Best For |
| Micro Studios | 250-350 sq ft | 15′ x 18′ to 15′ x 23′ | Solo minimalists who spend little time at home. Every square foot counts, and furniture must serve multiple purposes. Common in expensive urban markets like New York City and San Francisco. |
| Standard Studios | 350-500 sq ft | 18′ x 20′ to 20′ x 25′ | The most common size. Provides enough space to define separate zones for sleeping, living, and dining without feeling too cramped. Ideal for most single dwellers. |
| Large Studios | 500-700 sq ft | 22′ x 25′ to 23′ x 30′ | Spacious studios where you can incorporate furniture-based room dividers and create clearly defined functional areas. Comfortable for singles or couples. |
| Junior One-Bedrooms | 700+ sq ft | 25′ x 30’+ | While technically still studios, these larger spaces approach the size of a traditional one-bedroom and offer considerable flexibility for layout options. Perfect for couples or those needing a home office. |
Now that you know how studios are sized, you might be wondering how they compare to traditional one-bedroom apartments, a question many people ask when deciding between the two options.
Studio vs. One-Bedroom Floor Plans: What’s the Difference?
The distinction between studio and one-bedroom apartments goes beyond just square footage:
- A one-bedroom apartment layout has a separate, fully enclosed bedroom with a door, while a studio keeps all living spaces open (except the bathroom). This physical separation in one-bedrooms provides true privacy and noise control.
- One-bedroom apartments offer complete visual and acoustic privacy for sleeping areas. In studios, you create privacy through furniture arrangement, curtains, or room dividers.
- One-bedrooms typically start around 500-600 sq ft, while studios can be as small as 250 sq ft. However, a large studio can sometimes be bigger than a small one-bedroom.
- Studios generally cost less than comparable one-bedrooms in the same building or neighborhood. They also have lower utility costs due to reduced square footage.
- Studios work best for single occupants or couples comfortable with minimal privacy. One-bedrooms better accommodate couples, roommates, or anyone who works from home and needs a dedicated office space.
Understanding these differences is helpful, but the real question is: are the trade-offs of studio living worth it for you? Let’s examine the honest pros and cons.
But before that, if you’re looking for amazing one-bedroom house floor plans, check out our blog post!
Pros and Cons of Studio Apartment Floor Plans
Before committing to a studio apartment, it’s important to understand both the advantages and challenges you’ll face. This realistic assessment helps you decide if studio living aligns with your lifestyle and expectations.

- Studios are significantly more affordable than one-bedroom apartments. This makes them ideal for young professionals, college students, or anyone prioritizing location over space.
- With limited square footage, studios require minimal heating, cooling, and lighting. You’ll save substantially on electricity, gas, and water compared to larger apartments.
- Cleaning a studio takes minutes rather than hours. With everything in one room, dusting, vacuuming, and organizing become quick, simple tasks that fit easily into busy schedules.
- Without walls dictating room functions, you have complete freedom to arrange and rearrange your space as your needs change. Your studio can transform from entertainer’s loft to work-from-home office to peaceful retreat.
- Studios naturally encourage decluttering and intentional ownership. You’ll become more thoughtful about purchases and keep only what you truly need and love.
Challenges and Limitations
- The most obvious challenge is the restricted space. You must carefully consider every furniture piece and belonging to avoid overcrowding.
- With minimal or no closet space and limited room for additional storage furniture, organization becomes crucial and sometimes frustrating.
- If you live with a partner or frequently have guests, the lack of separate rooms can be challenging. There’s no door to close for privacy during phone calls or different sleep schedules.
- You can’t always fit the furniture you want. Standard-sized sofas, dining tables, and storage pieces often won’t work, requiring you to search for scaled-down alternatives.
- Since everything is visible in one space, keeping the studio tidy and organized is essential. Mess in one area affects the feel of the entire apartment.
Now that you understand what studio living entails, let’s explore the different floor plan layouts available and how to choose the right one for your needs.
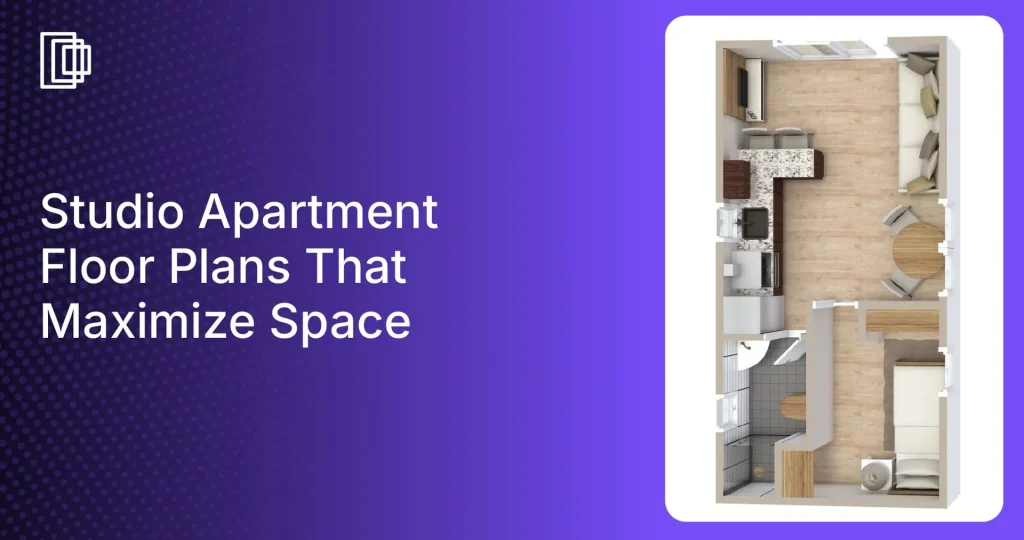
10 Studio Apartment Floor Plan Layouts (With Examples)
Choosing the right floor plan layout is the foundation of successful studio apartment living. The layout you select should align with your lifestyle, the architectural features of your space, and your functional priorities. Let’s explore 10 proven layouts, organized by size category, to help you identify which works best for your situation.
Small Studio Floor Plans (Under 400 sq ft)
When working with limited square footage, strategic layout choices make all the difference between a cramped space and a cozy, functional home.
1. Galley Studio Apartment Floor Plan Layout
The galley layout is one of the most efficient configurations for narrow studio apartments. In this arrangement, the kitchen runs along one entire wall, while your living and sleeping areas occupy the opposite side.

Layout description: The kitchen appliances, counter space, and storage line up in a single row along one wall. Across from it, you position your bed, seating area, and any additional furniture in a parallel arrangement. This creates a natural corridor down the center of the space.
Best for: Narrow, rectangular studio apartments where width is limited but length provides adequate space. This layout is particularly common in converted buildings or older apartment complexes.
Pros: Efficient use of narrow spaces, clear traffic flow down the center, keeps the cooking area separate from living space, and easy to keep kitchen mess contained.
Cons: Can feel corridor-like if not properly styled, limited width may restrict furniture size options, challenging to create visual separation between zones.
Pro tip: Use an area rug to define your living/sleeping zone and differentiate it from the kitchen side. Install a curtain track or room divider at the midpoint if you want to visually separate sleeping from cooking areas.
2. Corner Kitchen Studio Apartment Floor Plan Layout
This layout maximizes your open floor space by tucking the kitchen into one corner of the apartment, leaving the rest of the area free for living and sleeping zones.

Layout description: Kitchen cabinets, appliances, and counter space occupy an L-shaped configuration in one corner. The remaining three-quarters of the studio remains open for flexible furniture arrangement. This often works well when plumbing is already located in a corner.
Best for: Square or nearly-square studio apartments, or L-shaped studios where the kitchen can naturally fit into the shorter leg of the “L.” Ideal for those who don’t cook extensively and prefer to maximize living space.
Pros: Maximizes central open space, creates clear separation between kitchen and other functions, allows for flexible furniture arrangements, makes the studio feel larger and less segmented.
Cons: Kitchen may feel isolated or cramped in corner, less counter space than galley kitchens, corner location may limit natural light in cooking area.
Pro tip: Add a small kitchen cart or island on wheels that you can roll out for extra prep space when cooking, then tuck away to open up floor space when not in use.
3. Micro Studio Apartment Floor Plan Layout
Micro studios represent the ultimate challenge in space efficiency – every single inch must serve a purpose, and furniture must be carefully scaled to fit.

Layout description: In a micro studio, there’s no wasted space. The layout typically features a Murphy bed or loft bed to free up floor space during the day, wall-mounted or fold-down desk, compact all-in-one kitchen along one short wall, and multi-purpose furniture throughout.
Best for: Solo dwellers in expensive urban markets, minimalists who embrace compact living, young professionals who spend minimal time at home, or anyone prioritizing location over square footage.
Pros: Significantly lower rent, forces intentional decluttering and minimalism, often in prime urban locations, easier to clean and maintain, lower utility costs.
Cons: Extremely limited storage, requires constant organization, difficult to host guests, furniture options severely restricted, can feel claustrophobic without proper design.
Pro tip:
Invest in custom or modular furniture designed specifically for micro living. Every piece should serve at least two functions to maximize your limited space.
Medium Studio Floor Plans (400-500 sq ft)
Medium-sized studios hit the sweet spot – large enough to define separate zones while small enough to maintain coziness and remain affordable.
4. Classic Open Studio Apartment Floor Plan Layout

This is the most common studio configuration you’ll encounter; a true open-concept space with minimal architectural interruptions.
Layout description: One large rectangular or square room with kitchen along one wall or in one corner, bathroom separately enclosed, and the rest of the space completely open. No alcoves, no dividing walls, just pure flexibility for you to define zones through furniture placement.
Best for: People who prefer an airy, spacious feeling over defined privacy, those who embrace minimalist or modern aesthetics, renters who want maximum flexibility to rearrange, anyone who entertains frequently and wants an open flow.
Pros: Maximum flexibility for furniture arrangement, feels spacious and airy, easy to repurpose zones as needs change, good natural light distribution, ideal for modern or minimalist design styles.
Cons: Zero natural privacy for sleeping area, visual clutter in one zone affects the entire space, can feel undefined without intentional zoning, challenging for couples or roommate situations.
Pro tip: Use area rugs, lighting changes, and strategic furniture placement to create “invisible” walls that define zones without blocking sight lines or natural light. A well-placed bookshelf or sofa back can work wonders.
5. Alcove Studio Apartment Floor Plan Layout
An alcove studio features an architectural indentation or nook that creates a natural bedroom area without full walls.

Layout description: The studio has a recessed area (the alcove) that’s typically 6-8 feet deep, perfect for positioning a bed out of sight from the main living area. The alcove might have its own window or be tucked away from the entrance, creating a more private sleeping nook.
Best for: Anyone seeking more privacy than a traditional open studio offers, couples who want slight separation between sleeping and living areas, people who work from home and need to “close the office” mentally at night.
Pros: Natural bedroom separation without sacrificing square footage, feels more like a one-bedroom, better privacy for sleeping area, alcove often has its own window for ventilation, increased perceived value and rental rates.
Cons: Alcove depth may limit bed size options, less flexible than fully open layouts, can feel darker if alcove lacks windows, furniture placement somewhat dictated by architecture.
Pro tip: Enhance the sense of separation by installing a curtain rod or track at the alcove entrance. Use a stylish curtain you can draw for complete privacy at night and tie back during the day to maintain an open feel.
6. L-Shaped Studio Apartment Floor Plan Layout

L-shaped studios feature two connected rectangular spaces that create natural zoning opportunities through their architecture alone.
Layout description: The apartment forms an “L” shape, typically with the kitchen and dining area in one leg of the L and the sleeping/living area in the other leg. The corner where the two sections meet often houses the entrance or bathroom, creating a clear transition point between zones.
Best for: Corner apartment units with windows on two walls, those who want clear functional separation between zones, people who entertain and want to keep sleeping areas hidden from guests.
Pros: Architecture naturally creates two zones, excellent natural light from multiple exposures, sleeping area can be completely hidden from entrance, corner location usually means fewer shared walls and less noise.
Cons: L-shape can create awkward furniture placement in corner areas, one leg may feel separated from the other, potential for one zone to be darker if windows are unevenly distributed, longer walking distances between functional areas.
Pro tip: Place your bed in the leg farthest from the entrance and style that area as a true “bedroom” with bedside tables, proper lighting, and bedroom-appropriate decor. Use the other leg for kitchen, dining, and living functions.
7. Divided Studio Apartment Floor Plan Layout
Some studios come with a partial wall, half-wall, or permanent divider that creates semi-separation between sleeping and living areas (more than an open studio but not quite a one-bedroom.)

Layout description: A non-load-bearing wall extends partway across the studio (typically 3-6 feet from a side wall), creating a partial bedroom area. This wall might be floor-to-ceiling but not extend fully across, or it might be a half-wall that provides visual separation while maintaining some openness.
Best for: Anyone wanting maximum privacy in a studio footprint, couples who need some separation, people sensitive to light or noise in sleeping areas, renters who want the affordability of a studio with some one-bedroom benefits.
Pros: Genuine privacy for sleeping area, blocks light and some sound, feels like a junior one-bedroom, increases perceived value, better for couples or guests, clearly defined zones reduce visual clutter.
Cons: Partial wall placement is permanent, which means no layout flexibility, may block natural light to one area, can make the space feel smaller, reduce furniture arrangement options, may create a cave-like feel in the bedroom zone.
Pro tip: If your divided studio feels too closed off, add mirrors to the partial wall to bounce light and create the illusion of more space. Consider removing the divider only if your lease allows modifications.
Large Studio Floor Plans (500+ sq ft)
With 500+ square feet, you have the luxury of creating truly defined spaces that function almost like separate rooms.
8. Junior One-Bedroom Studio Apartment Floor Plan Layout

Junior one-bedrooms blur the line between studio and traditional one-bedroom. They’re large studios where you can use furniture to create a fully separated bedroom area.
Layout description: With 600+ sq ft to work with, you can position a proper room divider (large bookshelf, wardrobe, or custom partition) that completely separates your bed from sight. The “bedroom” area can accommodate a full-size bed, nightstands, and even a small dresser, while the living area has space for a sofa, entertainment center, and dining table.
Best for: Couples living in a studio, people who frequently have guests, those who work from home and need clear separation, anyone transitioning from a one-bedroom but wanting to save on rent.
Pros: Feels like a real one-bedroom apartment, complete privacy for sleeping area, room for proper furniture in each zone, can create a dedicated home office, better for couples or roommates, entertaining feels more natural.
Cons: Higher rent (though still less than one-bedrooms), room dividers reduce natural light to one area, maintaining sight lines requires careful planning, still technically a studio for resale/rental purposes.
Pro tip: Invest in a quality room divider that reaches the ceiling and looks finished on both sides. Floor-to-ceiling bookshelves or wardrobe systems work beautifully as permanent-feeling dividers that don’t require installation.
9. Loft Studio Apartment Floor Plan Layout
If you’re blessed with high ceilings (11+ feet), a loft configuration lets you create a raised sleeping platform, literally adding a second floor to your studio.

Layout description: A lofted sleeping area is built on a raised platform accessed by stairs or a ladder, creating a “second story” for your bed. Below the loft, you gain usable space for a home office, storage, closet area, or seating. The main floor contains your kitchen, living, and dining areas.
Best for: Studios with 11+ foot ceilings (12+ is ideal), younger renters comfortable with stairs/ladders, those who prioritize daytime living space, people seeking dramatic, unique interiors, those with minimal mobility issues.
Pros: Doubles your usable square footage, sleeping area completely separate and private, creates architectural interest and drama, maximizes floor space for living areas, excellent storage opportunities under the loft, cooler sleeping area (heat rises).
Cons: Requires professional installation (not DIY-friendly), climbing to bed nightly may be inconvenient, claustrophobic for some sleepers, difficult to make the bed or change sheets, not ideal for elderly or mobility-challenged, can’t sit up fully in bed, resale may be challenging.
Pro tip: Ensure your loft has at least 3.5-4 feet of clearance above the mattress; just enough to sit up comfortably. Install a railing for safety, and consider adding electrical outlets and lighting in the loft area for reading and charging devices.
10. Convertible Studio Apartment Floor Plan Layout
Convertible studios are designed for transformation – furniture and fixtures that change the space from daytime living area to nighttime bedroom with minimal effort.

Layout description: The studio features transforming furniture as the centerpiece, typically a Murphy bed (wall bed) that folds up into a wall unit, or a sofa that converts to a full-size bed. During the day, the bed disappears, giving you an expansive living room. At night, you pull the bed down for sleeping.
Best for: People who entertain frequently, those who work from home and need maximum daytime space, singles or couples willing to make/unmake the bed daily, urban dwellers seeking flexibility in smaller square footage.
Pros: Maximizes usable square footage during the day, entertaining is easier without a bed dominating the space, forces daily bed-making routine, sleek and modern aesthetic, high “wow factor” for guests, makes studio feel much larger.
Cons: Murphy beds are expensive ($1,500-$5,000+), requires daily setup and conversion, may need landlord permission for installation, some Murphy beds are uncomfortable, mattress options may be limited, sofa beds are notoriously uncomfortable for daily sleeping.
Pro tip: If investing in a Murphy bed, splurge on a quality mechanism and real mattress (not just a thin pad). If using a sofa bed, choose one specifically designed for nightly use, not occasional guests.
With these 10 floor plan options in mind, you’re ready to explore the specific design strategies that will bring your chosen layout to life and maximize every inch of your studio.
20+ Studio Apartment Floor Plan Design Ideas to Maximize Your Space
Now that you’ve chosen a floor plan layout, implement these smart design strategies to make your studio feel spacious, organized, and perfectly functional.
Furniture and Layout Solutions

- Invest in Multifunctional Furniture Pieces
Look for furniture that serves 2-3 functions – storage ottomans, coffee tables with lift-tops, sofa beds, and beds with built-in drawers. Many furniture retailers specialize in multifunctional pieces designed for small spaces. Before buying, ask yourself: “Does this serve at least two functions?”
- Choose a Murphy Bed or Loft Bed System
Reclaim 30-40 square feet of floor space by using a Murphy bed that folds into the wall ($1,500-$5,000) or a loft bed that elevates sleeping off the floor ($300-$800). For budget-friendly alternatives, consider modern sofa beds designed for daily sleeping.
- Use Floating and Wall-Mounted Furniture
Wall-mounted desks, floating TV stands, and floating nightstands create visual lightness and make studios feel more spacious. Always locate wall studs for secure mounting and consider weight limits, especially for desks and shelving.
- Select Appropriately Scaled Furniture
Choose apartment-sized furniture: 72-78″ loveseats instead of full-size sofas, 36-42″ round tables instead of standard dining tables, and full or queen beds instead of kings. Use painter’s tape to outline furniture footprints on your floor before buying to test if the scale feels right.
- Position Furniture Away from Walls
Pull your sofa 12-18 inches from the wall and use the back as a natural room divider between living and sleeping areas. Place a console table or bookshelf behind the sofa for added storage. This works best in studios 400+ sq ft.
Creating Zones and Defined Areas

- Design a Dedicated Entryway/Foyer
Use an area rug to define a 3′ x 4′ entry zone, add a narrow console table for keys and mail, install hooks for coats, and place a mirror. If space is tight, use over-the-door organizers on the back of your entry door.
- Use Room Dividers Strategically
Folding screens, floor-to-ceiling curtains, or open-back bookcases create privacy without permanent construction. Don’t block natural light or interrupt traffic flow. Maintain 30-36″ walkways. Install ceiling-mounted curtain tracks for flexible open/closed options.
- Create Visual Separation with Area Rugs
Place different rugs under living, dining, and sleeping zones to define spaces without blocking light. Rugs should be large enough that furniture front legs sit on them. Use coordinating colors but different patterns for cohesion with separation.
- Install Curtains or Sliding Panels for Privacy
Use ceiling-mounted tracks or tension rods to hang curtains that separate sleeping from living areas. Choose medium-weight fabrics in colors matching your walls so they blend when open but provide privacy when closed.
- Build or Install a Half Wall or Bookshelf Divider
Half walls (42-54″ high) or freestanding bookcases (60-72″ high) create substantial separation while maintaining light flow. Bookcases are renter-friendly and serve dual storage purposes. If building a half wall, include built-in storage for maximum functionality.
Storage and Organization Solutions

- Maximize Vertical Space with Floor-to-Ceiling Storage
Stack bookcases to ceiling height, install wall-mounted shelving, or use tall wardrobes to utilize unused vertical space. Always anchor tall furniture to walls for safety. Use uniform labeled boxes on high shelves for a cohesive look.
- Utilize Built-in and Custom Storage Solutions
Built-in window benches, alcove shelving, or custom closet systems maximize awkward spaces standard furniture can’t use. Costs range from $1,000-$5,000+. For rentals, consider portable wardrobe systems instead.
- Add Under-Bed Storage Systems
Use platform beds with drawers, storage beds with hydraulic lifts, or rolling under-bed bins to gain 10-20 cubic feet of storage. Store out-of-season clothing, bedding, shoes, or luggage. Use clear, labeled bins and vacuum-seal clothing to maximize space.
- Install Over-Door Organizers and Hooks
Pocket-style organizers on doors hold shoes, accessories, spices, toiletries, or office supplies without any installation. Don’t limit them to shoes – the pocket format is versatile for any small items that need organizing.
- Incorporate Hidden Storage in Furniture
Storage ottomans, lift-top coffee tables, console tables with drawers, storage headboards, and dining benches with lift-up seats hide belongings while keeping your studio clutter-free. Test lift mechanisms before buying to ensure smooth operation.
Lighting and Visual Expansion Techniques

- Layer Your Lighting (Ambient, Task, and Accent)
Use overhead lights for general illumination, desk and reading lamps for tasks, and picture lights or LEDs for accent. Install lights on separate controls and add dimmers to adjust brightness throughout the day.
- Maximize Natural Light with Window Treatments
Use sheer curtains, top-down/bottom-up shades, or minimal treatments to let in maximum light. Mount rods 3-6 inches above windows and extend 6-12 inches beyond frames so open curtains completely clear the glass.
- Use Mirrors Strategically to Reflect Light
Place large mirrors (36″ x 48″+) opposite or adjacent to windows to reflect natural light deeper into your space. Position mirrors above sofas, behind lighting, or angled in corners. Avoid reflecting clutter or unmade beds.
- Choose Light Colors for Walls and Ceilings
Paint walls and ceilings the same light color (whites, light grays, soft beiges) to eliminate visual boundaries and make spaces feel larger. Use semi-gloss or satin on ceilings to reflect more light than flat paint.
Design Details That Make a Difference

- Create a Cohesive Color Palette
Start with 2-3 base neutrals for large elements, add 1-2 accent colors for smaller pieces, and introduce texture through varied materials rather than lots of colors. Create a mood board before buying to ensure everything works together.
- Add Vertical Elements (Tall Plants, Floor Lamps, Art)
Tall plants, arc floor lamps, vertical art arrangements, and curtains hung near the ceiling draw the eye upward and make ceilings feel higher. Avoid horizontal design elements that make spaces feel compressed.
- Minimize Visual Clutter with Concealed Storage
Choose closed storage over open shelving, use matching boxes on any open shelves, manage cables with clips, and follow a “one in, one out” rule. Daily habits matter; make your bed and do dishes immediately.
- Use Transparent or Lucite Furniture
Lucite chairs, glass coffee tables, and acrylic side tables provide function without visual bulk. Balance transparent pieces with solid furniture; don’t go all lucite. Keep glass cleaner handy as these surfaces show smudges easily.
- Install Sliding Doors Instead of Swing Doors
Replace swinging bathroom or closet doors with sliding barn doors to save the 4-6 sq ft clearance space swing doors require. Hardware kits cost $150-$500+ and require ceiling/wall mounting. Check your lease first.
These design strategies work hand-in-hand with your chosen floor plan to create a studio that feels spacious and organized. But before you start implementing them, it’s crucial to have a solid plan in place, which is exactly what we’ll cover next.
How to Create Your Studio Apartment Floor Plan (Step-by-Step)
Whether you’re moving into a new studio or reimagining your current space, following a systematic approach ensures your floor plan is functional, proportional, and optimized for your lifestyle.
Step 1: Measure Your Space Accurately
Accurate measurements are the foundation of successful floor planning. Measure overall room dimensions (length × width), ceiling height, window and door locations with sizes, electrical outlet positions, and built-in features like closets or alcoves.
Use a 25-foot measuring tape or laser measuring device, and photograph everything for reference. Measure twice to confirm accuracy and note which direction windows face since this impacts natural light distribution.
Step 2: Identify Fixed Elements (Windows, Doors, Plumbing)

Fixed elements are the immovable parts of your studio that dictate layout options. Map window locations and sizes (you can’t block them with tall furniture), door positions and swing directions (furniture can’t interfere with operation), plumbing for kitchen and bathroom (expensive to move), electrical outlets (influences lamp and TV placement), and HVAC vents or radiators (need clearance).
On your floor plan, mark fixed elements in a different color so they visually stand out as constraints you must design around.
Step 3: Determine Your Priority Zones

Not all activities are equally important to every person. List all desired zones (sleeping, living, dining, work/office, kitchen, dressing, storage, entry), then rank them 1-8 based on your lifestyle. The top 3-4 should receive the most space and best positions near windows or convenient to the entrance.
Be realistic about how you actually live – if you never cook elaborate meals, don’t sacrifice living space for a large dining table you won’t use.
Step 4: Plan Furniture Placement and Scale

Start with the largest pieces first (bed, sofa, dining table), then maintain proper clearances: 30-36″ for main walkways, 24-30″ for secondary paths, and 18″ between coffee tables and sofas.
Use graph paper with furniture templates cut to scale, digital tools like floor planning software, or painter’s tape on your actual floor to test layouts before buying furniture.
Step 5: Map Out Circulation Paths
Traffic flow dramatically impacts livability. Identify primary circulation paths (entrance to kitchen, entrance to bathroom, bed to bathroom), ensure main pathways have 30-36″ clearance and secondary paths have 24-30″ minimum, and avoid creating dead ends where possible.
On your floor plan, draw arrows showing your most common movements. If arrows constantly cross furniture or squeeze through tight gaps, reconsider your layout.
Step 6: Visualize with Floor Plan Software

Digital floor plan tools let you experiment with layouts quickly and see your space in 3D before spending money on furniture. Create your room outline with exact measurements, add windows, doors, and fixed elements, browse furniture libraries and add pieces to your floor plan, then switch to 3D mode to see how everything looks together.
Create 3-5 different layout options and compare them side by side. Sometimes the layout you think will work best doesn’t actually feel right when visualized.
With a solid floor plan in hand, you’re ready to implement your design. But first, let’s make sure you avoid the common mistakes that plague studio dwellers.
Common Studio Apartment Floor Plan Mistakes to Avoid
Even well-intentioned studio designs can fail if they commit these common errors. Learning what doesn’t work helps you avoid frustrating, expensive mistakes.
Mistake #1: Blocking Natural Light with Poor Furniture Placement
The problem: Tall furniture in front of windows or beds/sofas blocking light makes studios feel smaller, darker, and cave-like.
Fix it: Keep tall furniture like bookcases and wardrobes at least 3 feet from windows. Use low-profile pieces such as dressers or benches near window areas instead. Position mirrors opposite or adjacent to windows to bounce light deeper into the space, and arrange furniture so natural light can travel through the entire studio unobstructed.
Mistake #2: Overcrowding the Floor Plan
The problem: Cramming in every piece of furniture you want creates visual chaos and makes your studio feel smaller than it is.
Fix it: Leave at least 20% of your floor space completely empty to create breathing room. Choose 5-7 essential, high-quality pieces instead of 15 cheap ones that clutter the space. Select apartment-sized furniture like 72-78″ sofas instead of standard 90″ ones, and remove anything that doesn’t serve a clear function or bring you genuine joy.
Mistake #3: Ignoring Proper Circulation Space
The problem: Walkways narrower than 24″ force you to turn sideways and make daily living frustrating.
Fix it: Maintain 30-36″ clearance for main pathways like entrance to bathroom or bed to kitchen. Allow 24-30″ minimum for secondary paths around furniture. Create circular flow patterns with multiple routes to reach destinations, and test all clearances with painter’s tape on the floor before committing to furniture purchases.
Mistake #4: Forgetting to Plan for Storage
The problem: Focusing only on living spaces without storage planning leads to constant clutter and disorganization.
Fix it: Plan for 8-12 linear feet of hanging space for clothing and 20-30 cubic feet for shelving and folded items. Include vertical storage solutions like floor-to-ceiling shelving and tall wardrobes. Choose multi-functional furniture such as storage ottomans and beds with built-in drawers, and add creative solutions like over-door organizers and under-bed storage bins.
Mistake #5: Choosing the Wrong Floor Plan for Your Lifestyle
The problem: Selecting a trendy layout that doesn’t match how you actually live creates daily frustration.
Fix it: Match your lifestyle to the right layout type. If you work from home, choose a junior one-bedroom or divided studio with space for a dedicated desk. Frequent entertainers should opt for convertible studios where beds can be hidden when guests visit. Couples benefit from alcove or divided studios that offer some privacy.
Minimalists thrive in classic open studios with maximum flexibility, while those with lots of belongings need layouts with maximum built-in storage potential.
Now that you know what to do and what to avoid, let’s explore how to bring your perfect studio design to life with professional visualization tools.
Design and Visualize Your Studio Floor Plan with Foyr Neo
You’ve learned about 11 floor plan layouts and 24+ design ideas; now it’s time to bring your vision to life. Creating a detailed floor plan before moving furniture or making purchases saves time, money, and the frustration of discovering too late that something doesn’t fit or work.
Foyr Neo is an interior design software built specifically to help you design smarter, faster, and with complete confidence.
Create accurate 2D floor plans in minutes
Input your exact studio dimensions, add windows, doors, and fixed elements in their actual locations, and create a scaled floor plan that serves as the foundation for all your design decisions.
See your studio in realistic 3D instantly
Switch from 2D to immersive 3D view with one click. Walk through your studio virtually before moving a single piece of furniture and understand how spaces actually feel, something flat floor plans can’t show.
Test unlimited layout options
Browse 60,000+ furniture and decor items, drag and drop pieces to test different arrangements, and create multiple layout configurations in minutes. Compare them side by side to find what works best for your lifestyle.
Avoid expensive mistakes
See how natural light enters through windows, identify problems like oversized furniture or awkward circulation, and test color palettes and materials digitally, all before spending a single dollar.
Share professional visualizations
Generate photorealistic 4K renderings to get landlord approval for changes, share with friends and family for feedback, or use as shopping references to ensure everything matches your vision.
Ready to design your dream studio? and transform your studio apartment from cramped and cluttered to spacious and stylish.
Frequently Asked Questions About Studio Apartment Floor Plans
What is a good size for a studio apartment?
For a single person, 400-500 sq ft is ideal. Micro studios (250-350 sq ft) work for minimalists, standard studios (350-500 sq ft) allow for defined zones, and large studios (500-700 sq ft) comfortably fit couples or home offices. Add 50-100 sq ft if you own lots of belongings.
What is the most efficient studio apartment floor plan?
It depends on size. Under 400 sq ft: galley layouts. 400-500 sq ft: corner kitchen open concepts. 500+ sq ft: junior one-bedroom layouts with furniture dividers. Efficient plans minimize hallways, maximize vertical storage, and use scaled furniture.
Can you have a separate bedroom in a studio floor plan?
Studios don’t have permanent bedroom walls by definition, but you can create the feeling of separation using floor-to-ceiling curtains, tall bookshelves or wardrobes, folding screens or sliding panels, or loft beds. These solutions provide visual privacy but limited acoustic privacy since there’s no solid insulated wall.
How do you arrange furniture in a studio apartment floor plan?
Place the largest pieces first (bed, sofa, desk), then define zones through positioning. Keep beds away from entrances and use sofa backs as dividers. Maintain 30-36″ for main walkways, 24-30″ for secondary paths. Try L-shaped, parallel, or corner arrangements.
What software is best for creating studio apartment floor plans?
Foyr Neo offers the best combination of 2D floor planning, instant 3D visualization, 60,000+ furniture items, and 4K rendering capabilities with a 14-day free trial. Most users create their first floor plan in under an hour.