You know that feeling when a full bath feels like overkill, but a powder room just isn’t enough? That is where the 3/4 bathroom shines. It is perfect for guests, ideal for basements, and is high on utility.
Whether you are an interior designer looking for fresh inspiration or a homeowner aiming to boost property value, this guide is for you. Let’s break down exactly how to design a 3/4 bathroom layout that feels spacious, functions perfectly, and looks incredible.

What Exactly Is a 3/4 Bathroom?
Typically, a bathroom has four main components: a toilet, sink, shower, and bathtub. A 3/4 bathroom contains exactly three of these four elements. This configuration is incredibly versatile for modern homes where square footage is premium, but you still need full bathing functionality for family members or overnight guests.
Here are the common configurations of 3/4 bathroom:
- The Standard: Toilet + Sink + Shower. This setup is the absolute go-to for most renovations because it balances hygiene needs with space efficiency perfectly.
- The Soaker: Toilet + Sink + Tub (No shower head). This is less common but fantastic for relaxation zones where you want a spa vibe without the visual clutter of shower curtains.
What Are the Minimum Dimensions for a 3/4 Bathroom?
You can technically squeeze a 3/4 bath into a space as small as 32 square feet (approx. 5’ x 6.5’). However, while physically possible, pushing the boundaries this far often results in a cramped experience.
Understanding standard dimensions is essential before you start exploring any bathroom layout ideas.
- Comfortable: 40 sq. ft. (5’ x 8’) – Allows for a standard vanity and easier movement. This is the sweet spot where you don’t feel like you are knocking your elbows against the walls constantly.
- Spacious: 45+ sq. ft. (6’ x 8’ or larger) – Fits luxury features like a double vanity or linen closet. At this size, your 3/4 bathroom layout feels much more like a master suite.
Which 3/4 Bathroom Layout Works Best for Narrow Spaces?
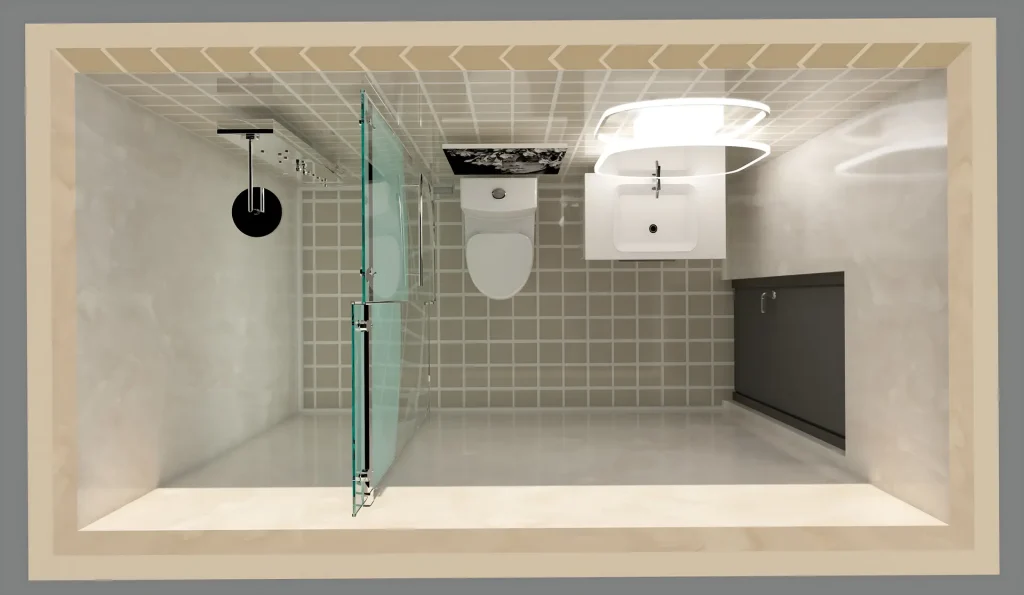
The Linear (One-Wall) Layout works best for narrow spaces. By placing the sink, toilet, and shower along a single wet wall, you reduce plumbing complexity and keep the walkway clear. Its benefits include:
- Cost-Efficient: Keeps all water supply and drain lines in one wall. This significantly lowers your plumbing bills because you are not running pipes across the room’s width.
- Flow: Creates a clear, unobstructed path from the door to the shower. It ensures that even in a narrow room, movement feels natural and completely unhindered.
- Visuals: Allows for a large mirror along the wall to double the visual width of the room. It reflects light beautifully, making tight quarters feel twice as big.
How Can You Maximize a Square Floor Plan?
The Corner Shower Layout is the champion of square rooms. In a 6’ x 6’ or 7’ x 7’ space, placing a neo-angle or curved glass shower in the corner opens up the center of the room.
Here is the design strategy you can follow:
- Corner 1: The Shower. By tucking the bulky shower enclosure into a corner, you immediately regain floor space that would otherwise be wasted on standard rectangular pans.
- Corner 2: The Toilet (opposite the door if possible). Positioning the toilet here keeps it out of the immediate line of sight, which is always preferred aesthetically.
- Corner 3: The Vanity. Placing the vanity in the third corner or along an adjacent wall ensures the sink is easily accessible without blocking the entry or shower door.
- Center: Open circulation space. This arrangement prevents the “bowling alley” feel of linear layouts and makes the room feel larger, giving you room to breathe and move freely.
What Is the ‘Split-Entry’ Layout?
This is the ultimate layout for shared spaces or Jack-and-Jill bathrooms. It divides the bathroom into two distinct zones, usually separated by a pocket door.
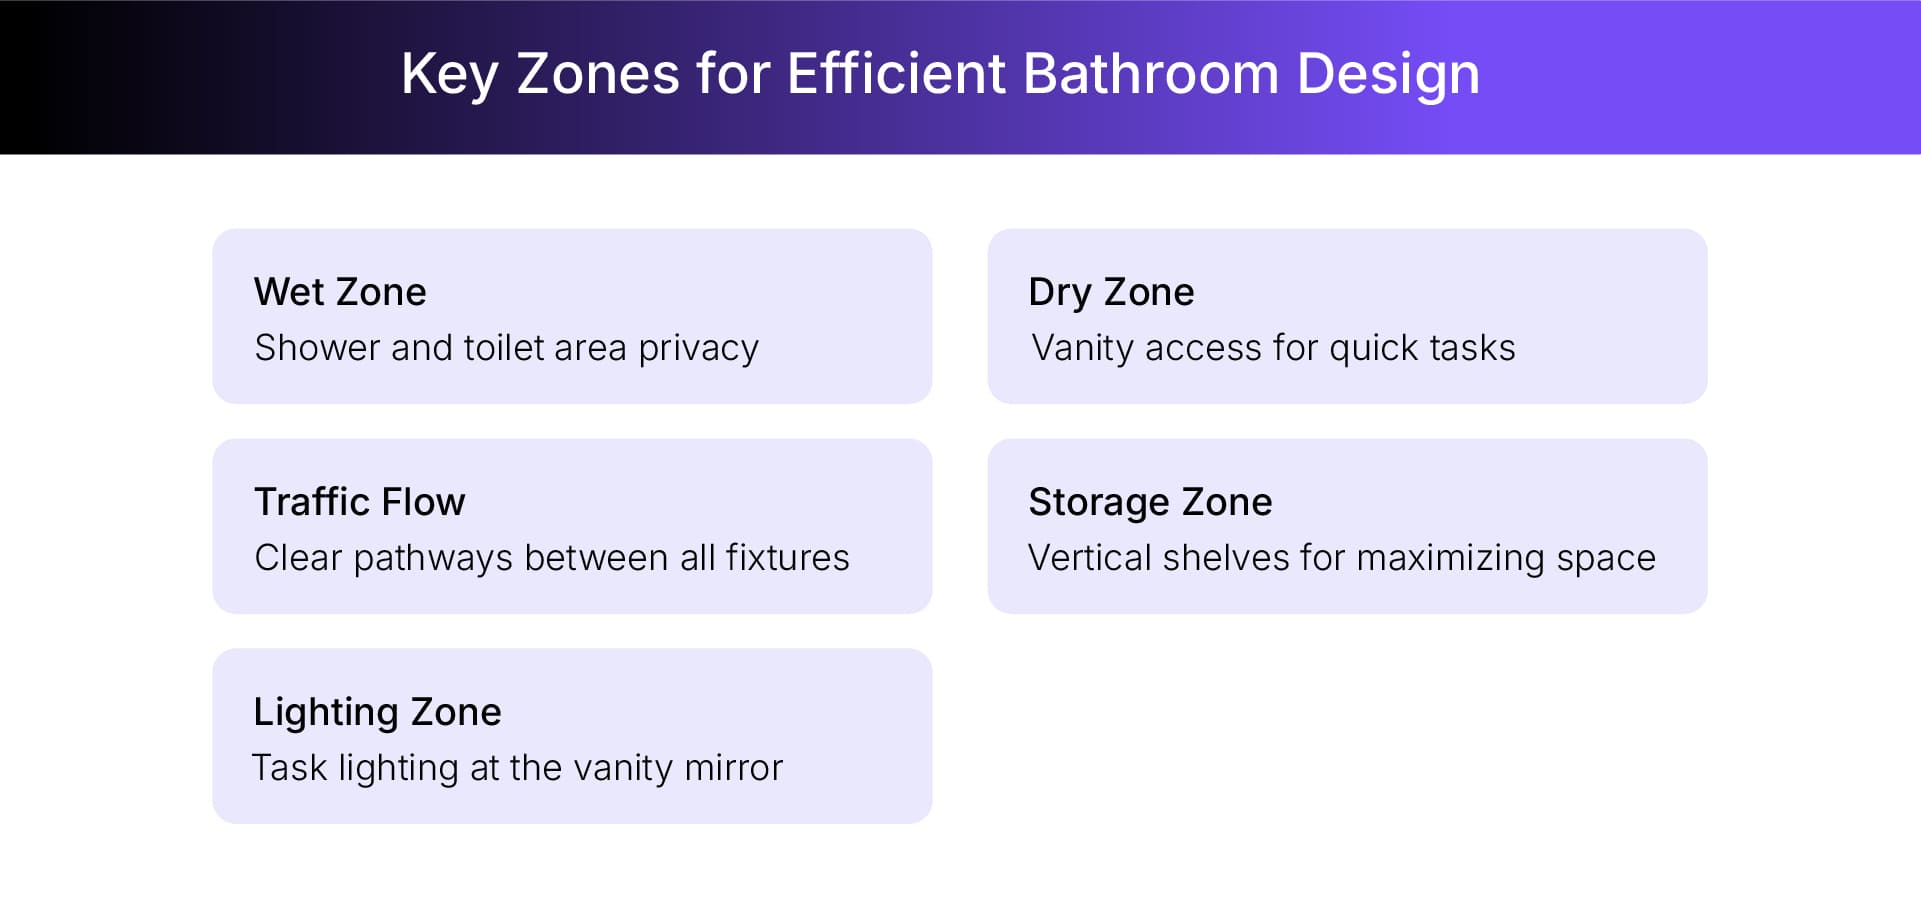
- Dry Zone: Vanity and mirror (accessible to guests for handwashing). This area remains open for quick morning tasks like brushing teeth or washing hands without disturbing anyone inside the wet zone.
- Wet Zone: Toilet and shower (private area). This enclosed section ensures complete privacy for bathing or using the toilet, effectively turning one bathroom into two functional spaces.
7 Genius 3/4 Bathroom Floor Plans to Inspire Your Project
When you are ready to finalize your 3/4 bathroom layout, selecting the right configuration is critical for maximizing both style and function in your limited space.
1. The Classic 5×8 Linear

5X8 Layout is the industry standard. All your plumbing fixtures, i.e., sink, toilet, and shower, are aligned on a single wet wall to streamline installation.
💡To ensure everything fits perfectly before construction, you can use the Ruler Tool in Foyr Neo to create precise measurements between objects and verify clearances meet code requirements.
Key Features:
- Plumbing is consolidated on one wall to save costs and simplify the rough-in process for contractors.
- The door typically swings open against the empty wall to avoid blocking the vanity or the toilet area.
The Setup:
Place the vanity closest to the door, followed by the toilet, and finally the shower at the far end. This visual hierarchy keeps the bulkier shower visually recessed, making the room appear larger upon entry.
Why It Works:
This efficient 3/4 bathroom layout minimizes plumbing runs, which saves you money, and maximizes the open floor area for comfortable movement.
The 6×6 Square Corner

Perfect for squarer footprints where you want to avoid a tunnel effect. This layout leverages corners and keeps the central space open.
💡When visualizing such compact spaces, the Pan Feature in Foyr Neo lets you adjust camera positions without changing angles, helping you create perfect viewpoints for renders even in small bathroom designs.
Key Features:
- Fixtures are distributed on two or three walls to balance the visual weight across the entire room.
- Ideally suited for a pedestal sink or a compact floating vanity to maintain an airy and open feel for the bathroom.
The Setup:
Tuck the shower into one corner and place the toilet and vanity on the adjacent walls flanking the shower. The triangular arrangement allows you to stand in the center and reach everything easily..
Why It Works:
This 3/4 bathroom layout eliminates dead space in the center of the room, making a small square footage feel surprisingly generous. It encourages a natural traffic pattern that rotates around the central open area.
3. The Narrow Galley (3×9 or 4×10)

Common in older homes or when stealing space from a closet. This is a long, thin layout that requires smart positioning.
💡Using a 3D visualization software like Foyr, you can instantly test if a galley 3/4 bathroom layout feels too claustrophobic before committing to the build.
Key Features:
- Fixtures are often split between two opposing walls or lined up on one long wall for efficiency.
- Lighting placement is crucial to banish shadows and prevent the space from feeling like a dark tunnel.
The Setup:
Place the shower at the very end of the narrow room to utilize the full width for the wet area. Arrange the sink and toilet along one long wall leading up to the shower enclosure.
Why It Works:
This 3×4 bathroom layout turns awkward architectural leftovers into fully functional hygiene spaces.
4. The “Jack-and-Jill” Split

Ideal for bathrooms shared between two bedrooms or a hallway and a bedroom. It requires careful door placement to manage access.
💡To ensure symmetrical design elements, you can use guidelines in Foyr Neo to create reference lines for consistent placement of doors and vanities.
Key Features:
- Features two separate entry doors, allowing access from different rooms, which is perfect for siblings or guests.
- Usually requires a slightly larger footprint to accommodate the extra doors and adequate circulation space for two people.
The Setup:
Center the vanity area with doors on either side or opposite each other for easy access from both rooms. Isolate the toilet and shower behind a second internal door to create a private wet zone.
Why It Works:
This versatile 3/4 bathroom layout massively increases the functionality of a single bathroom by allowing it to serve two rooms
5. The Luxury Guest Suite (8×8)

If you have a bit more room to play with, this layout feels like a hotel spa.
💡You can elevate the design by using the lighting feature in Foyr Neo to turn on/off individual lights in your renders for perfect ambiance every time you present the design to a client.
Key Features:
- Allows for premium features like a larger walk-in shower with a bench or a spacious double vanity.
- Provides ample room for decorative elements like a linen tower, plants, or a statement chair.
The Setup:
Create a T-shape or U-shape arrangement where the vanity acts as the focal point upon entering. Place the toilet effectively out of direct sightline and feature a large, glass-enclosed shower as a luxury element.
Why It Works:
This spacious 3/4 bathroom layout impresses guests and provides a relaxing, unhurried experience similar to a master bath.

6. The “Tucked Away” Basement Layout

Basements often have support columns and weird soffits. This layout embraces the quirks rather than fighting them.
💡If you have existing blueprints, use Foyr’s Trace Your Floor Plan feature, where you upload your plan and we trace it for you within 24 hours.
Key Features:
- Utilizes a macerating toilet or sewage ejector pump if the main drain line is above floor level.
- Often features a custom-shaped shower to fit around existing structural columns or low ceiling soffits.
The Setup:
Locate the bathroom near existing plumbing stacks to minimize concrete trenching and reduce overall construction costs. Orient the shower in the corner with the lowest ceiling height to save the higher headroom for standing areas.
Why It Works:
This practical 3/4 bathroom layout transforms underutilized basement square footage into living space for guests or family. It adds convenience without disrupting the main living areas on the upper floors of the home.
7. The Micro-Bath Conversion (5×6)

For when you are turning a half-bath (powder room) into a 3/4 bath. Space is tight, so you need to be creative.
💡Use Foyr’s AI designing tool to add, change, or delete textures and products with simple prompts to test different finishes instantly.
Key Features:
- Replaces a standard swinging door with a pocket door or barn door to save precious floor space.
- Requires a compact, wall-mounted sink and toilet to maximize every inch of legroom available.
The Setup:
Convert the entire back portion of the room into a curbless shower area with a linear drain. Place a small wall-hung toilet and sink near the entrance to keep the wet area distinct yet accessible.
Why It Works:
This clever 3/4 bathroom layout squeezes maximum utility out of a tiny footprint, adding a full shower where none existed.
If you are struggling to visualize these layouts in 3D, check out this tutorial on creating spaceswith Foyr Neo.
3/4 Bathroom Layout Best Practices
Here are the 3/4 bathroom layout best practices that can make even the tiniest bathroom feel airy and open.
- Mounting vanities to the wall reveals more floor area to make the room look significantly wider.
- Swap curtains for clear frameless glass to remove visual barriers and expand the perceived room size.
- Using identical tile designs for both floors creates an unbroken visual line that expands the small space.
- Tall, narrow cabinets draw the eye upward while effectively reducing clutter on your limited countertops.
Common Mistakes to Avoid When Planning 3/4 Bathroom Layout
You must watch out for these common pitfalls that can ruin the functionality of your 3/4 bathroom layout.
- Ensure the entry door swings freely without hitting the vanity or blocking critical toilet access.
- Install a powerful exhaust fan to prevent moisture buildup that leads to mold and expensive damage.
- Add vanity sconces alongside ceiling lights to eliminate shadows and make the space feel welcoming.

How Can You Visualize Your 3/4 Bath Before Building?
Drawing on a napkin is fine, but seeing your 3/4 bathroom layout in photorealistic 3D changes everything. With Foyr Neo, you can drag and drop 3/4 bathroom elements into your exact floor plan dimensions. Swap a pedestal sink for a floating vanity in seconds, or see if that 36-inch shower really fits without cramping the toilet.
You can also, use the one-click 2D to 3D conversion feature in our interior design software to:
- Catch clearance issues before you order materials.
- Show homeowners exactly how their new guest bath will look with realistic textures and lighting.
- Iterate through different layouts quickly, allowing you to find the perfect solution without manual drafting
Try Foyr today, signup for a 14-day free trial
FAQs
Can I put a 3/4 bathroom in a 5×5 space?
It is extremely tight, but possible if you turn it into a wet room. In a standard setup, a 5×5 space is usually better suited for a powder room. A 3/4 bathroom layout typically requires at least 30-32 square feet to be functional and meet building codes comfortably.
Does a 3/4 bath add value to a home?
Absolutely. Adding a 3/4 bath increases home value, often recovering 60-70% of the cost at resale. This type of washroom is more popular in homes that only have one full bathroom.
What is the smallest shower size allowed?
Most building codes require a minimum interior shower dimension of 30 inches by 30 inches. However, for a comfortable 3/4 bathroom layout, a 32×32 or 36×36 inch shower is recommended to prevent elbow bumping and ensure a pleasant showering experience.
Is a 3/4 bath considered a full bath?
In real estate listings, a 3/4 bath (toilet, sink, shower) is often counted as a full bathroom because it offers bathing facilities. However, technically speaking, a “full bath” must include a bathtub. For practical daily use, most people consider them functionally equivalent and equally valuable.